
22R Rebuild

 10-12-2009, 03:00 PM
#62
Registered User
Thread Starter

My alternator is filthy with caked-on grime inside and out. What's good to use to clean it up without hurting anything, including the coating on the windings? Electrical contact cleaner?
I'll probably replace the brushes.
I'll probably replace the brushes.
10-14-2009, 04:30 PM
#63
Registered User
Join Date: Oct 2009
Location: Virginia Beach
Posts: 95
Likes: 0
Received 0 Likes
on
0 Posts
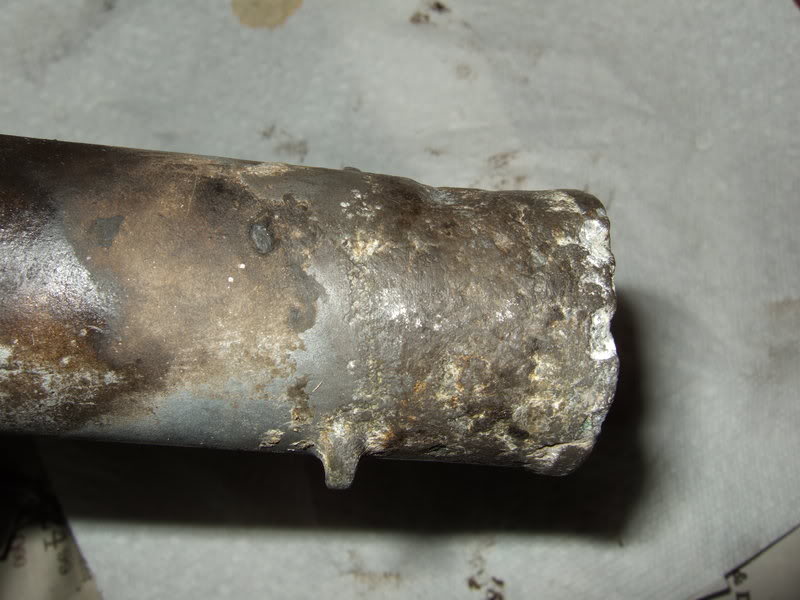
regarding the junk you found in the pan afterwards, I just thought I'd share what I found in mine when I pulled the engine on my first Toyota truck, which was a 2wd model. the P.O. had torn into it at least once. I'm guessing it was for a broken timing chain, as, in addition to the little beauty shown below, there were several curious tiny metal "sleeves" in there too -- they were the spacers between the links on the chain!
in case you don't recognize it, this is one of the timing chain guide bolts. I can only presume that the guide broke, and the bolt rattled loose. from the looks of it, it may even have been the cause of the broken timing chain, the bolt having fallen right down into the works. can only imagine what sort of noise or mechanical mayhem that caused.
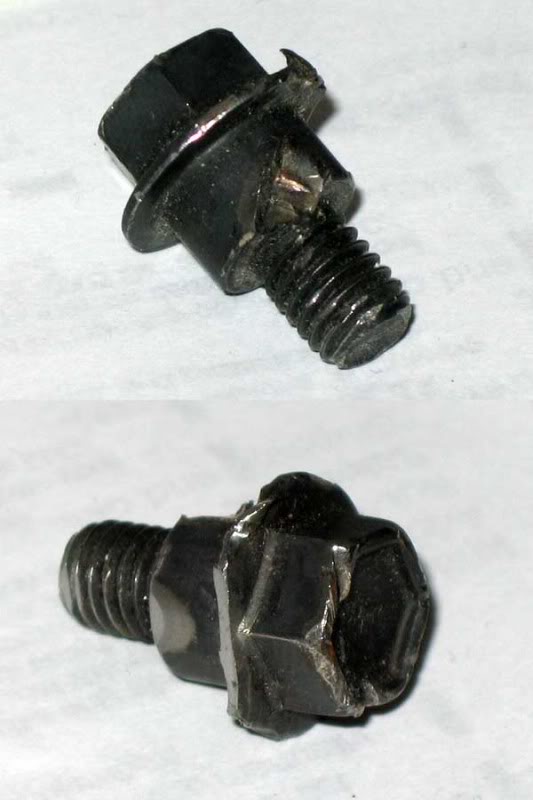

in case you don't recognize it, this is one of the timing chain guide bolts. I can only presume that the guide broke, and the bolt rattled loose. from the looks of it, it may even have been the cause of the broken timing chain, the bolt having fallen right down into the works. can only imagine what sort of noise or mechanical mayhem that caused.
Last edited by yodta; 10-14-2009 at 04:33 PM.
10-14-2009, 04:53 PM
#64
Registered User
Join Date: Sep 2009
Location: Sarasota, Florida
Posts: 126
Likes: 0
Received 0 Likes
on
0 Posts
 10-15-2009, 03:21 PM
#65
Registered User
Thread Starter
Ouch. That'd ruin your day. Is it advised to use blue Loctite on those and/or the tensioner bolts?
I cleaned up my engine compartment. A battery had a problem before I got the truck, so that area won't look nice unless repainted. I doubt I'll bother. The rest isn't iamsuperbleeder kind of clean, but better than it was.
As I got done spraying everything off I found the pencil end I had stuck in my fuel line had fallen out. I think it's the intake, not the return. I don't know how much water got in, so I'll siphon some gas through to flush the line when I replace the hose.
10-15-2009, 04:55 PM
#66
Registered User
Join Date: Oct 2009
Location: Virginia Beach
Posts: 95
Likes: 0
Received 0 Likes
on
0 Posts
mmm, not sure about the tensioner bolts, but I can't see it hurting anything on the chain guide bolts.
just wire brush it, blow it out with air, and then hit it with some primer and/or some Rustoleum.
just wire brush it, blow it out with air, and then hit it with some primer and/or some Rustoleum.
10-22-2009, 02:34 PM
#67
Registered User
Thread Starter
The machine shop just called. The guy was amazed how great my block and pistons are, even asking when it was last rebuilt. 
He said I can either use iron rings with my existing pistons or bore over and use moly rings on new pistons. He said iron rings would last 90K-100K miles.
The block needs to be decked by .010" to .012". I'm thinking that much with stock pistons would result in too much quench, particularly since mine were above 0 to begin with. Aftermarket pistons are destroked by about .012" to accommodate decking.
So, should I keep my OEM parts and use iron rings, or bore .020" over and buy a master kit from Engnbldr?
I asked about the groove in my crank. The machinist said to leave it alone and that a newer double lipped seal should seal fine.
Last edited by flyingbrass; 11-19-2009 at 08:19 PM.
 10-23-2009, 02:46 PM
#69
Registered User
Thread Starter
I e-mailed Ted. He advised using new pistons, so today I ordered:
street/rv head
268 cam
master kit (pistons .020 over, others standard)
timing cover
head bolts
water pump
Came to $886 shipped. My order should ship Tuesday.
So far, I've spent a lot more time researching, learning and waiting than wrenching.
street/rv head
268 cam
master kit (pistons .020 over, others standard)
timing cover
head bolts
water pump
Came to $886 shipped. My order should ship Tuesday.
So far, I've spent a lot more time researching, learning and waiting than wrenching.
10-23-2009, 04:10 PM
#70
Registered User
Nice work man!!
I am doing a timing chain with a friend next week on a 22r. It will be the second one I have done. Your pictures will be a big help.
Great job. Keep up with the pics!!
I am doing a timing chain with a friend next week on a 22r. It will be the second one I have done. Your pictures will be a big help.
Great job. Keep up with the pics!!
10-23-2009, 07:46 PM
#71
Registered User
Join Date: Oct 2009
Location: NW Phoenix
Posts: 134
Likes: 0
Received 0 Likes
on
0 Posts
Excellent! Your motor is gonna be better than new. Gonna do this again in 25 or so years?? Keep up the good work, and give us a pic of the new head, as well as the naked block when you get it back from the shop. I love engine porn!
10-25-2009, 12:33 AM
#72
Registered User
Thread Starter
I hope you're right. Time will tell.
25 years from now? If I'm still alive I may be learning and asking about retrofitting a fuel cell or whatever other power tech is popular into an old Toyota.
I'll post pics when the parts arrive.
25 years from now? If I'm still alive I may be learning and asking about retrofitting a fuel cell or whatever other power tech is popular into an old Toyota.
I'll post pics when the parts arrive.
 10-30-2009, 03:24 PM
#74
Registered User
Thread Starter
My parts from Engnbldr arrived today. I've been sick with flu this week, and it still hasn't let up. I got worn out just hauling in the boxes. I haven't looked at everything yet. I will later and post some pics. So far, the only issue I've noticed is with the timing cover. More on that later.
I noticed Putney's Custom Machine has put up some interesting Youtube videos: http://www.youtube.com/user/putneysc.../4/iPOJXDyw0F4
The instructions in Engnbldr's timing kit say to install everything, tape the tensioner back, and slide the upper timing gear on the cam. Make sure some clearance exists between driver side guide and chain (the guide can be adjusted a little). So, that means install the head before the timing cover. I had it in mind that the head would go on after the cover. Any thoughts?
10-31-2009, 05:53 AM
#75
Registered User
Thread Starter
I went through most of my parts. The head will have to wait. I'm worn out. Flu sucks.
The pistons look good. I don't have any way to measure them precisely. On my kitchen scales they weighed: 425g, 425g, 423g, 424g. That's a little under half a percent spread. Seems pretty decent to me.
The water pump looks good and spins about the same as my old Aisin.
I'm not impressed with the oil pump. My original Aisin's clearances measure within spec. The Rock is at the outer limit between crescent and outer gear at a full .012". That's the max allowed. Range is supposed to be .0087" to .0098". Inner gear to crescent is a little on the tight side at .003" (range .0059" to .0083" for that one if I'm understanding the manual correctly). Plus, the timing number area is chipped and difficult to read.
Compared to my old one on top.
The timing cover also isn't very impressive. What at first glance looked almost like cracks in places are actually small ridges. Sort of an eggshell effect . The oil passages to and from the oil pump are quite rough. Most of that is cosmetic. The potential functional issue is the water pump mating surface is not completely flat. A portion at the top wasn't milled to the same depth as the rest. It's hard to show in pictures, but here are a couple:
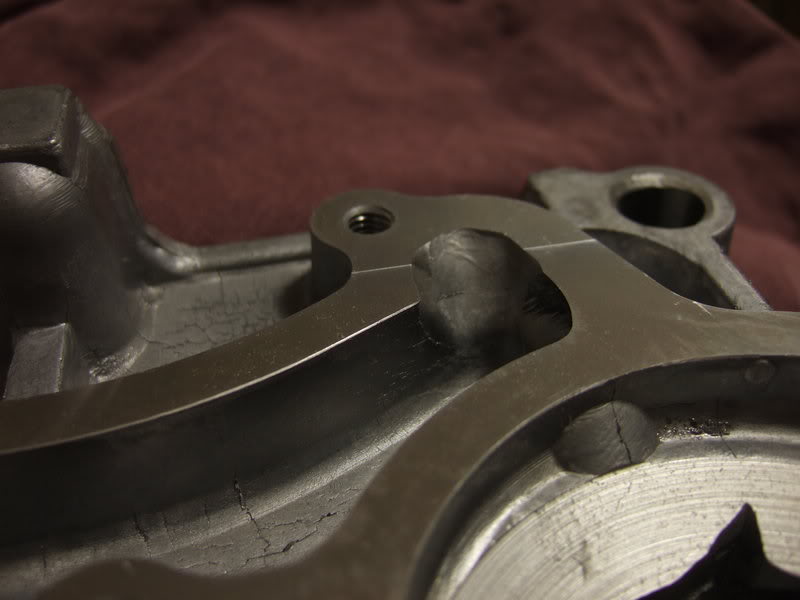
I don't know if the step is bad enough to cause an issue. It is a little concerning. I've read many advocate putting the water pump gasket on dry. I'm not sure a gasket by itself will seal in this case. My pump didn't have a gasket, only orange FIPG. Any opinions? I need to decide whether I'm going to use this one ASAP. The shop is waiting for me to bring parts.
The only thing wrong with my original cover is the radiator hose tube is badly corroded. In the worst spot it's very thin, almost all the way through. Strange how it corroded like that under the hose.
The pistons look good. I don't have any way to measure them precisely. On my kitchen scales they weighed: 425g, 425g, 423g, 424g. That's a little under half a percent spread. Seems pretty decent to me.
The water pump looks good and spins about the same as my old Aisin.
I'm not impressed with the oil pump. My original Aisin's clearances measure within spec. The Rock is at the outer limit between crescent and outer gear at a full .012". That's the max allowed. Range is supposed to be .0087" to .0098". Inner gear to crescent is a little on the tight side at .003" (range .0059" to .0083" for that one if I'm understanding the manual correctly). Plus, the timing number area is chipped and difficult to read.
Compared to my old one on top.
The timing cover also isn't very impressive. What at first glance looked almost like cracks in places are actually small ridges. Sort of an eggshell effect . The oil passages to and from the oil pump are quite rough. Most of that is cosmetic. The potential functional issue is the water pump mating surface is not completely flat. A portion at the top wasn't milled to the same depth as the rest. It's hard to show in pictures, but here are a couple:
I don't know if the step is bad enough to cause an issue. It is a little concerning. I've read many advocate putting the water pump gasket on dry. I'm not sure a gasket by itself will seal in this case. My pump didn't have a gasket, only orange FIPG. Any opinions? I need to decide whether I'm going to use this one ASAP. The shop is waiting for me to bring parts.
The only thing wrong with my original cover is the radiator hose tube is badly corroded. In the worst spot it's very thin, almost all the way through. Strange how it corroded like that under the hose.
10-31-2009, 06:04 AM
#76
YotaTech Milestone-Two Millionth Post
I am alot concerned about those pictures, cosmetic or not.
I have heard only the highest praise for ENGNBLDR on this site. I woud think that you should contact them and voice you concerns. Myelf as a non-mechanic, I am concerned that you picked up all those irregularities / deficiencies whereas I may not.
Please post what you are going to do. I know you said that the shop waiting for your parts, but I'm sure you aren't their only income and you should have complete confidence in what you are bolting on 1st.
10-31-2009, 06:39 AM
#77
Registered User
Thread Starter
I just e-mailed Ted.
I'll probably reuse my old oil pump. I didn't really even want a new one, but it came with the master kit.
Not sure what to do about the timing cover. If worse comes to worst I'll find someone to weld up the corroded part of mine. New Aisin covers cost about $120.
I'll probably reuse my old oil pump. I didn't really even want a new one, but it came with the master kit.
Not sure what to do about the timing cover. If worse comes to worst I'll find someone to weld up the corroded part of mine. New Aisin covers cost about $120.
10-31-2009, 08:13 AM
#79
Registered User
I just e-mailed Ted.
I'll probably reuse my old oil pump. I didn't really even want a new one, but it came with the master kit.
Not sure what to do about the timing cover. If worse comes to worst I'll find someone to weld up the corroded part of mine. New Aisin covers cost about $120.
I'll probably reuse my old oil pump. I didn't really even want a new one, but it came with the master kit.
Not sure what to do about the timing cover. If worse comes to worst I'll find someone to weld up the corroded part of mine. New Aisin covers cost about $120.
10-31-2009, 08:21 AM
#80
Registered User
Thread Starter
My old Aisin cover is corroded where the radiator hose attached. Apart from that, it's fine. It's the one I'd try to repair.
The Rock cover has a small step (about .003" higher) in the upper part where the water pump attaches. And it's generally messy. I'll clean up the inside if I use it. Some of those "ridges" flake off with a fingernail.
The Rock cover has a small step (about .003" higher) in the upper part where the water pump attaches. And it's generally messy. I'll clean up the inside if I use it. Some of those "ridges" flake off with a fingernail.
Last edited by flyingbrass; 10-31-2009 at 08:22 AM.


