
22R Rebuild


 03-25-2010, 06:59 PM
#363
Registered User
Thread Starter

I forgot about my sig. How's this?
I doubt the shop used a torque plate when boring. From what I've gathered, doing so is nice, but not really necessary for a street engine like this. A torque plate is used to simulate the pressure on the block when the head is bolted in place, ideally making the bored holes more round.
Ted advises rechecking head bolt torque after the first run. I think his reasoning is mostly to make sure one wasn't accidentally undertorqued. Evenness is critical to a good seal. Seems to me that heat cycling might change things a bit. Either way, rechecking soon (and before adjusting valves) is a good idea. Marlin wrote that he always rechecks head bolts before adjusting valves on these motors. And that's not only after a rebuild.
My head bolt installation is described back in post 265. Final torque was 64 ft/lbs. I used 10.9 grade bolts from Engnbldr.
Last edited by flyingbrass; 03-25-2010 at 07:13 PM.
03-25-2010, 07:05 PM
#364
Registered User
Join Date: Jan 2010
Posts: 38
Likes: 0
Received 0 Likes
on
0 Posts
lol i knew a fish would take the hook. all other things equal ( which shouldnt have to be stated) a 3 row is much much better than a 2 row. you have more fluid being cooled. simple.
case in point. i used to water ski during the summers at a lake in california. around noon, heat of the day, we would leave on last day and head down freeway. 100+ degrees,towing a sanger ski tug, low profile pole in front of engine, not a tourney boat, ski boat. running ac, with two core radiator truck over heated. 3 core? never a worry, truck temp stayed right where it was supposed to be. if you tow anything with that truck and have overheating issues ditch the stock 2 core and get the three core....problem solved......JJ
case in point. i used to water ski during the summers at a lake in california. around noon, heat of the day, we would leave on last day and head down freeway. 100+ degrees,towing a sanger ski tug, low profile pole in front of engine, not a tourney boat, ski boat. running ac, with two core radiator truck over heated. 3 core? never a worry, truck temp stayed right where it was supposed to be. if you tow anything with that truck and have overheating issues ditch the stock 2 core and get the three core....problem solved......JJ
03-25-2010, 07:17 PM
#365
lol i knew a fish would take the hook. all other things equal ( which shouldnt have to be stated) a 3 row is much much better than a 2 row. you have more fluid being cooled. simple.
case in point. i used to water ski during the summers at a lake in california. around noon, heat of the day, we would leave on last day and head down freeway. 100+ degrees,towing a sanger ski tug, low profile pole in front of engine, not a tourney boat, ski boat. running ac, with two core radiator truck over heated. 3 core? never a worry, truck temp stayed right where it was supposed to be. if you tow anything with that truck and have overheating issues ditch the stock 2 core and get the three core....problem solved......JJ
case in point. i used to water ski during the summers at a lake in california. around noon, heat of the day, we would leave on last day and head down freeway. 100+ degrees,towing a sanger ski tug, low profile pole in front of engine, not a tourney boat, ski boat. running ac, with two core radiator truck over heated. 3 core? never a worry, truck temp stayed right where it was supposed to be. if you tow anything with that truck and have overheating issues ditch the stock 2 core and get the three core....problem solved......JJ
03-25-2010, 08:48 PM
#367
Registered User
Thread Starter
I cut the oil filter open that I used for the 10 minute initial run and 5 mile drive. This is the first time I've opened one up. I'll look at it closer tomorrow in the daylight. A magnet run through the drained oil didn't pick up anything except a few tiny flecks. They could have come from the tranny oil the pan held before.
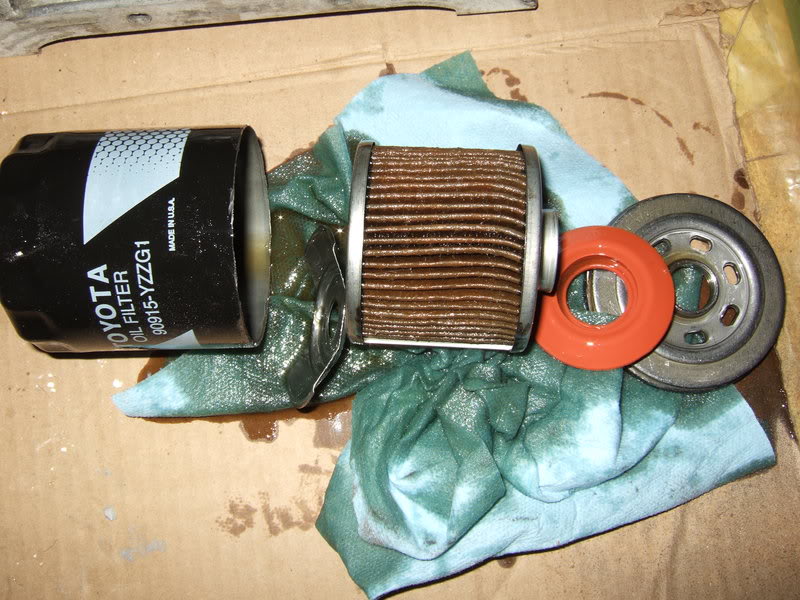

Last edited by flyingbrass; 03-25-2010 at 08:57 PM.
03-26-2010, 06:17 AM
#369
Registered User
Join Date: Oct 2009
Location: NW Phoenix
Posts: 134
Likes: 0
Received 0 Likes
on
0 Posts
Awsome job brass. You are a "pro" now. When I rebuilt my 22RE, I spent like 6 months with my eyes on the temp and oil guages. Now, it's just nice to enjoy the drive without worry. Congrats! I'm happy for 'ya.
03-27-2010, 02:33 PM
#370
Registered User
Thread Starter
Thanks. I'm not a pro by any stretch of the imagination, but I know more than before. I wish I had an oil pressure gauge. I'll be watching everything else closely and won't fully trust this engine for quite a while.
This morning I retorqued the head bolts (tighten only, no loosening). Most of them moved. I've read that's typical after heat cycling. I adjusted the valves again. Set them .007" and .009" cold. How important is it to adjust them hot? I figure they open up slightly from the cold setting.
Rocker noise is typical 22R sewing machine. A little noisier than I remember from before, but most of my valves ended up way too tight before the teardown. Plus, I haven't heard one of these engines in over 6 months.
I drove 10 miles to the store, punching the gas and engine braking when I could to continue the break-in. Didn't notice any leaks when I got there. On the way back I stopped at a friend's house for an hour or so.
When I went to leave I did a quick check and saw a couple drops of oil on the ground. The front seal is leaking. I should have gone with a narrower seal or sleeved the pulley. Still not sure which I'll do.
So far, I have 25 miles on the engine.
Last edited by flyingbrass; 03-29-2010 at 02:00 AM.
03-27-2010, 02:34 PM
#371
Registered User
Thread Starter
03-27-2010, 02:51 PM
#372
Registered User
Join Date: Jul 2009
Location: hubert nc
Posts: 1,151
Likes: 0
Received 0 Likes
on
0 Posts
I've been making a mental list for a tool kit to carry. I need to put everything in a box instead of jammed behind the seat. Already back there is a blanket, 2x8 blocks, factory bottle jack, cheater pipe, odds n ends of wrenches, channel locks, screwdrivers, hose clamps, a hose or several, old belts (probably the originals), zip ties, and the all-important, always keep it there so you don't get caught without when wheeling: toilet paper.
I'll add some more sockets, extensions, etc. JB weld is a great idea.
My tooth is semi-ok for the time being, but I know it's borrowed time.
I went to an Interstate battery store/warehouse (69th and Orangewood for those in the west valley) and had them make me a battery cable. They didn't have any 4 gauge wire, so they used 2 gauge. Crimped part of my old main cable into the clamp to go to the fender/body ground screw. Only cost $11.48 after tax. Nice, helpful people there. Before making the cable they pulled a pallet off a top shelf with a forklift and dug through the boxes it held to see if they had a pre-made one that would work. A+ for customer service.
i think you could of gotten a cable from advance auto parts for about 8.99 i think..
03-27-2010, 03:38 PM
#373
Registered User
Thread Starter
There's a Toyota 90311-45014 in Stace's stuff. I'll use it and either pick up a new one later or pay him for it.
Here's a thread about using these narrower seals: https://www.yotatech.com/forums/f114...81-2wd-126295/
Seems easiest to remove the oil pump to put the new seal in. Might be a stupid question, but how much oil would I lose taking the pump off? Big mess or small?
Here's a thread about using these narrower seals: https://www.yotatech.com/forums/f114...81-2wd-126295/
Seems easiest to remove the oil pump to put the new seal in. Might be a stupid question, but how much oil would I lose taking the pump off? Big mess or small?
03-27-2010, 04:39 PM
#375
Registered User
Thread Starter
Is there anything to be gained by draining some oil first? Most should be in the pan.
I took off the fan, radiator shroud and belts. Got the crank pulley bolt out (not bad when it hasn't been in for decades) and slid the pulley off. Now just debating how to go about this.
I took off the fan, radiator shroud and belts. Got the crank pulley bolt out (not bad when it hasn't been in for decades) and slid the pulley off. Now just debating how to go about this.
Last edited by flyingbrass; 03-27-2010 at 05:25 PM.
03-27-2010, 06:15 PM
#376
Registered User
Thread Starter
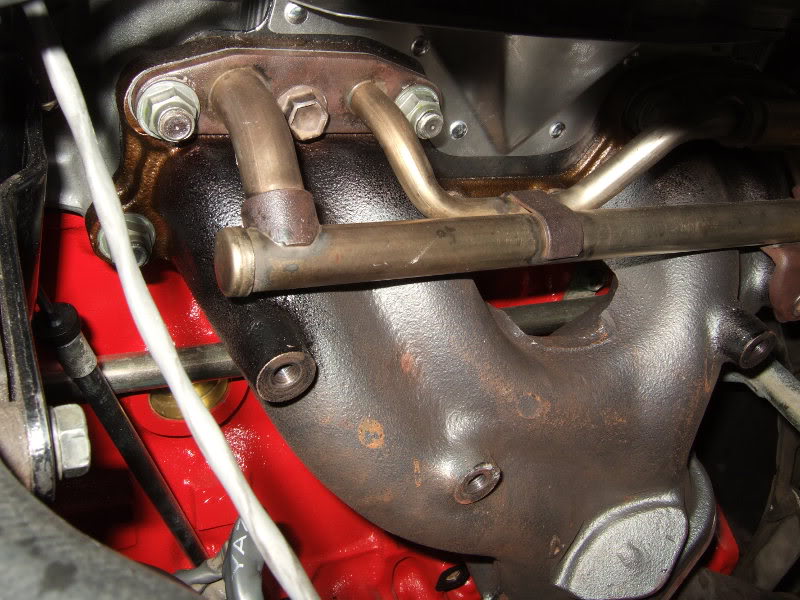
I retorqued the exhaust manifold nuts as Ted had advised. They all required some turning. I'm using 30 ft/lbs. The book calls for 33, but I feel better reducing it slightly since I used anti-seize on the threads.
As I predicted, the Crisco seasoning has already burned off. See around the edges how you'd have a nice black color if the temp didn't get quite so high. Oh well, it was worth a try. Kind of interesting to see which parts get the hottest. The seasoning on the flanged area that bolts to the head hasn't even darkened yet.
Before, I used wood blocks and an old woodworker's clamp/vise to press in the oil seal. The thinner Toyota seal has a double lip, which I learned from ruining a nice Toyota rear seal shouldn't be done that way. Looks like a slice of 2" schedule 40 PVC pipe will be close to the right size to press or tap it in. I'll find out in the morning.
Last edited by flyingbrass; 03-27-2010 at 08:47 PM.
03-27-2010, 08:33 PM
#377
Registered User
Thread Starter
I thanked Ted for his help along the way and asked about retorquing head bolts. Marlin wrote about checking them each time before adjusting valves. Maybe that's because many he encounters have never been retorqued? Mine turned quite a bit after the first run, and I had worked them in before better than many bother.
I also asked about the need to adjust valves hot. Guess I'd better find some decent gloves.
Here is Ted's reply:
----------------------
Hi.
Glad you got her running. I suggest rechecking the head bolts after a full warmup and again at 500 miles, usually no need to after that.
Valve adjustments should be set with the engine warmed up, then again at each annual tuneup or as needed.
They can change from the cold setting quite a bit. I just wear gloves to keep from getting burned.
Ted
---------------------
03-28-2010, 12:43 PM
#378
Registered User
Thread Starter
Removing the oil pump didnt spill much oil. Hold some paper towels on the bottom as it comes off. After sitting overnight, I'm guessing maybe a 1/4 cup came out.
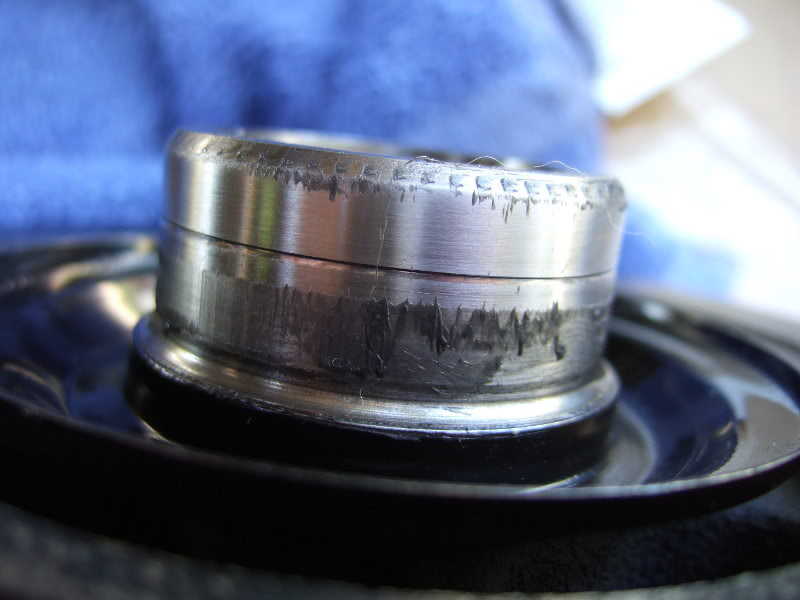
A weight plate came to the rescue for seating the new seal. The inner raised area is about seal size, and the plate diameter is just small enough to clear the timing mark extension.
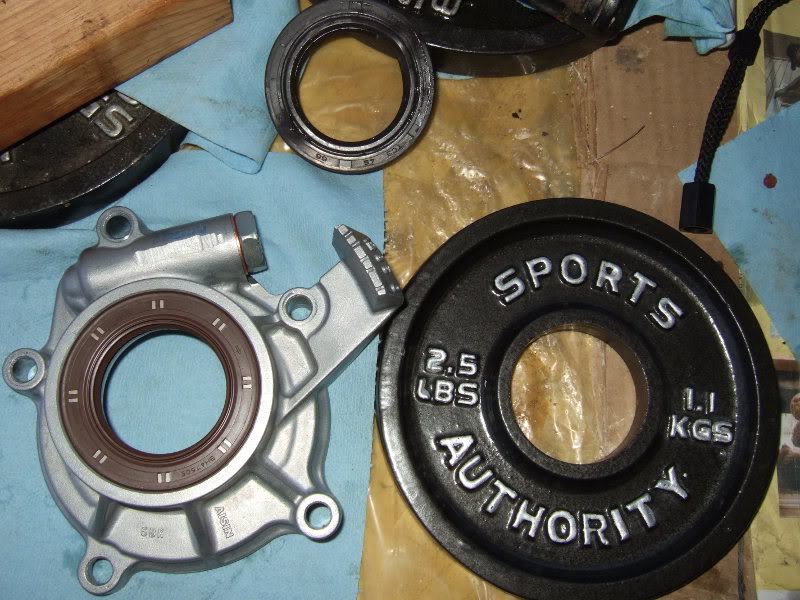
This is a hair deeper than I wanted to seat the new, thinner Toyota seal, but after one part went that deep I had to make the rest match.

To get an idea where the new seal rides, I put the oil pump housing in place loosely with a couple bolts, greased the crank pulley and put it on. Slid it back and forth a few times. Looks like the new lip is well away from the groove.
I cleaned and installed the oil pump gears using a little assembly lube, then packed the gears with Vaseline. Got everything buttoned back up. I hope this cures the leak.
A weight plate came to the rescue for seating the new seal. The inner raised area is about seal size, and the plate diameter is just small enough to clear the timing mark extension.
This is a hair deeper than I wanted to seat the new, thinner Toyota seal, but after one part went that deep I had to make the rest match.
To get an idea where the new seal rides, I put the oil pump housing in place loosely with a couple bolts, greased the crank pulley and put it on. Slid it back and forth a few times. Looks like the new lip is well away from the groove.
I cleaned and installed the oil pump gears using a little assembly lube, then packed the gears with Vaseline. Got everything buttoned back up. I hope this cures the leak.
Last edited by flyingbrass; 03-28-2010 at 11:05 PM.
03-28-2010, 03:42 PM
#379
Registered User
Join Date: Jul 2009
Location: Eastern NC
Posts: 832
Likes: 0
Received 0 Likes
on
0 Posts
That thinner seal, is it gen toyota or from a parts store?
I need to go back through your post and write down the part no# of that napa rear seal you put in. I am going to have the same problems with the groves in the crank that I am having polished.
Great work
Never mind I should have read a little more.
I need to go back through your post and write down the part no# of that napa rear seal you put in. I am going to have the same problems with the groves in the crank that I am having polished.
Great work
Never mind I should have read a little more.
Last edited by TinMan; 03-28-2010 at 03:48 PM.
03-28-2010, 06:17 PM
#380
Registered User
Thread Starter
Glad you found it. Opinions vary, but narrower seals make sense to me as long as fresh surface remains for them to ride against. If someone has already used that trick, you're stuck with a sleeve or a new part.
11 miles so far on the new seal. I ran it pretty hard when possible (hard accel w/engine braking), continuing the break-in process. I didn't see any drips immediately after pulling into the driveway, but that doesn't mean much. If it still looks ok in the morning I'll take it through emission testing tomorrow.
We have the IM-240 test here in Maricopa County. I hate letting those idiots run my truck. I'll probably hide in the booth this time instead of suffering in the passenger seat.


