
22R Rebuild
 03-01-2010, 04:56 AM
#281
Super Moderator
Staff
iTrader: (1)
Join Date: Aug 2008
Location: Anderson Missouri
Posts: 11,788
Likes: 0
Received 25 Likes
on
22 Posts
A few post ago someone was asking about the airconditioner pulley and power steering pulley. To buy the power steering pulley system is quite expensive but I bought the bearing at Orielly and if I remeber right the part numer is someting like FB101 or Fb303. It is actually really commom bearing and is around $5 if memory serves right. Just ask to look in their bearing section. I pressed mine on with a vise and pressed it off with a vise and large diameter socket. Hope this helps.
 03-02-2010, 10:46 PM
#284
Registered User
Join Date: Jan 2010
Posts: 38
Likes: 0
Received 0 Likes
on
0 Posts
seeing all those pics brought back some memories im repeating lol
did u service the engine regularly? good quality antifreeze changes on regular basis? i was curious about the rust etc in block.
your pics helped out many im sure. i hope the rebuild turned out great and you enjoy it for many years. JJ
did u service the engine regularly? good quality antifreeze changes on regular basis? i was curious about the rust etc in block.
your pics helped out many im sure. i hope the rebuild turned out great and you enjoy it for many years. JJ
03-04-2010, 04:27 PM
#287
Registered User
Thread Starter

I didn't change the coolant as often as I should have, and I didn't used distilled water. It'll be distilled from now on, and changed at least every 2 years.
I hope I haven't built a ship in a bottle. We'll find out tomorrow. I reassembled the engine in my kitchen. I'm hoping it can squeeze out the front door, which is closest to the truck. After taking off the air resonator gizmo, nothing on the intake side should stick out beyond the wheel of the stand. It will still be a tight fit.
Most everything that needs to be on to install is except for the air tube going from the reed valve to the exhaust. Also, the heater hose that goes to the heater control valve. I'm debating whether to pick up a cheap hose for $10 tomorrow (easy to install with the engine out) or order a Goodyear. The old one is worse than I thought. I'm not going to touch the hoses that go into the heater itself. Let sleeping dogs lie. If/when the core starts leaking I'll replace them along with the core.
I ordered new motor mounts from John's Foreign Engines. They looked to be the same ones as mentioned earlier and were slightly cheaper. $52 shipped for the pair, and are scheduled to arrive tomorrow. I still haven't figured out how I want to chain them.
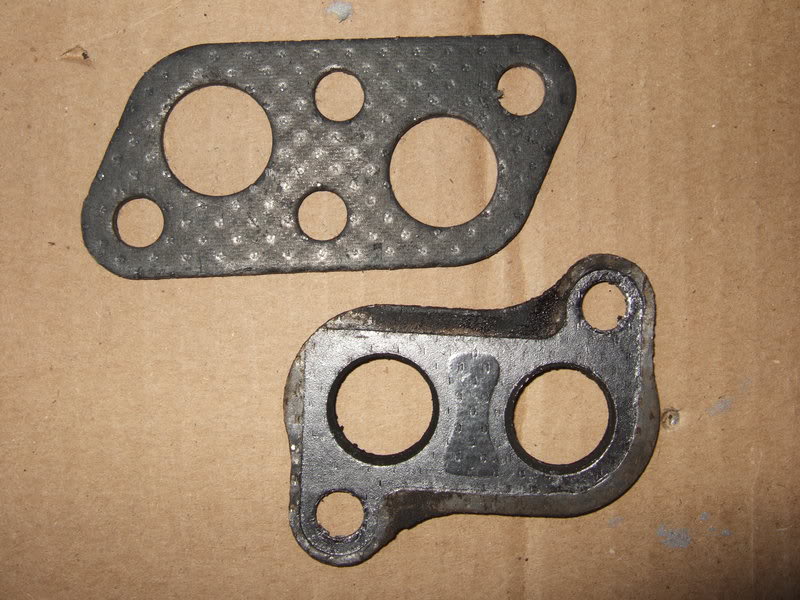
Engnbldr's kit didn't come with the gasket that goes between the PAIR valve and air tubes, only the one for the other end of the tubes. Couldn't find one in Stace's stuff either. I ordered one at the dealer, and it should be in tomorrow. Here are both, the bottom being the one MIA:
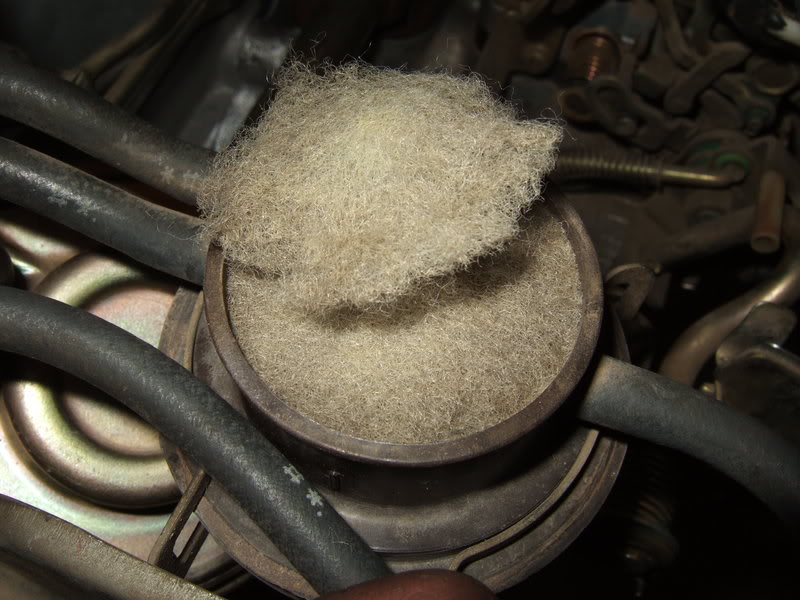
I finally got the cap off the EGR modulator to check the filter. Being so old, I was afraid it might break. I gritted my teeth and pulled it off. Got lucky for a change. I don't know if the filter was originally in several layers, but it is now. Seemed pretty clean.
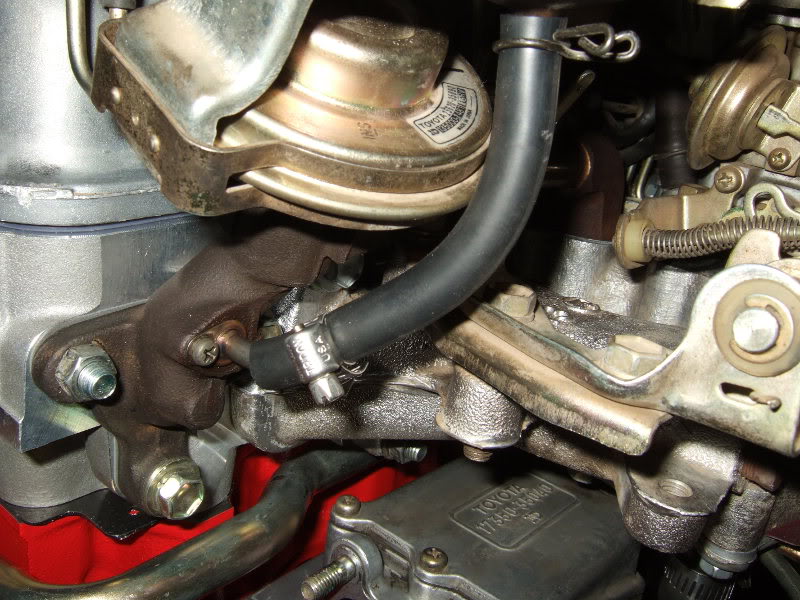
I replaced the line from the bottom of the EGR modulator to the EGR valve body. The old one was oil soaked and swollen at the bottom, not gripping at all, so I don't know how snug they are supposed to be. The new line I used seemed slightly oversized where it fits on the EGR, so I added a hose clamp. I used regular vacuum line.
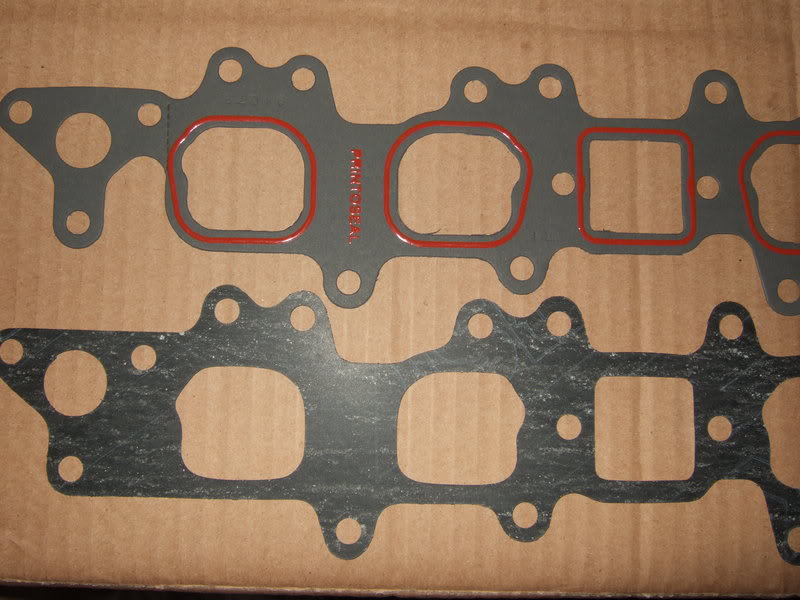
I picked up a Fel-Pro intake gasket, which has a pre-applied bead on the side facing the intake (it's bare on the head side). Below it's compared to the one from Engnbldr's kit. I don't know much about gaskets and have no idea which is better. Engnbldr's seemed more dense -- less paperish. What are the factory gaskets like?
The plan is to wheel the engine outside tomorrow. R&R the pilot bearing, get the flywheel and clutch put on. Depending on what time the motor mounts show up, might even get it put in. Otherwise, Saturday.
I hope I haven't built a ship in a bottle. We'll find out tomorrow. I reassembled the engine in my kitchen. I'm hoping it can squeeze out the front door, which is closest to the truck. After taking off the air resonator gizmo, nothing on the intake side should stick out beyond the wheel of the stand. It will still be a tight fit.
Most everything that needs to be on to install is except for the air tube going from the reed valve to the exhaust. Also, the heater hose that goes to the heater control valve. I'm debating whether to pick up a cheap hose for $10 tomorrow (easy to install with the engine out) or order a Goodyear. The old one is worse than I thought. I'm not going to touch the hoses that go into the heater itself. Let sleeping dogs lie. If/when the core starts leaking I'll replace them along with the core.
I ordered new motor mounts from John's Foreign Engines. They looked to be the same ones as mentioned earlier and were slightly cheaper. $52 shipped for the pair, and are scheduled to arrive tomorrow. I still haven't figured out how I want to chain them.
Engnbldr's kit didn't come with the gasket that goes between the PAIR valve and air tubes, only the one for the other end of the tubes. Couldn't find one in Stace's stuff either. I ordered one at the dealer, and it should be in tomorrow. Here are both, the bottom being the one MIA:
I finally got the cap off the EGR modulator to check the filter. Being so old, I was afraid it might break. I gritted my teeth and pulled it off. Got lucky for a change. I don't know if the filter was originally in several layers, but it is now. Seemed pretty clean.
I replaced the line from the bottom of the EGR modulator to the EGR valve body. The old one was oil soaked and swollen at the bottom, not gripping at all, so I don't know how snug they are supposed to be. The new line I used seemed slightly oversized where it fits on the EGR, so I added a hose clamp. I used regular vacuum line.
I picked up a Fel-Pro intake gasket, which has a pre-applied bead on the side facing the intake (it's bare on the head side). Below it's compared to the one from Engnbldr's kit. I don't know much about gaskets and have no idea which is better. Engnbldr's seemed more dense -- less paperish. What are the factory gaskets like?
The plan is to wheel the engine outside tomorrow. R&R the pilot bearing, get the flywheel and clutch put on. Depending on what time the motor mounts show up, might even get it put in. Otherwise, Saturday.
Last edited by flyingbrass; 03-04-2010 at 08:37 PM.
03-04-2010, 07:53 PM
#288
Registered User
Join Date: Jan 2010
Posts: 38
Likes: 0
Received 0 Likes
on
0 Posts
great job so far. a tip for the future kitchen engine rebuilds: tape measures are cheap 
keep new coolant and distilled water in it and you will be in great shape. those two gaskets? ive used the one with orange ring and never had a problem. i also put a bit of the blue sealant around the water journals.
GL on the install and fire up. my engine is still on the stand.......goes to machine shop next monday.
03-04-2010, 10:45 PM
#289
Registered User
Thread Starter
I measured the stand's wheel width but until the intake was on didn't know how far it stuck out to the side. It should be ok, but tight.
I used the Fel-Pro intake gasket without any extra sealants. I considered using something on the head side around the water passages. Maybe I should have. The head is shiny new, so there aren't any gouges to worry about.
Before enough time passes that I forget, here's what I've ended up using in different places. Don't take any of this as a recommendation. It's more like an experiment. Surfaces were degreased with brake or carb cleaner.
Rear seal housing gasket: High Tack spray on both sides (very light coating).
Timing cover gaskets: skim coated both sides all over with Permatex Ultra Grey RTV. Same for the back side where the water pipes attach (applied there when attaching the pipes). Dabbed a tiny bit extra using a toothpick up into the head/block/cover junction before attaching the cover (the head was already on). Initial thoughts: messy, and probably not necessary. Maybe even counterproductive. We'll see.
Water pump gasket: High Tack spray on both sides.
Rear cover plate gasket: High Tack spray on both sides.
Fuel pump: High Tack spray except left bare against the head.
Oil pump through bolt: Permatex #2.
Oil galley plugs in block, oil pressure sensor, oil plug under motor mount, coolant drain plug in the block, EGR through bolt: Permatex High Temperature Thread Sealant.
"Hidden" top timing cover bolt: Permatex Ultra Grey under the bolt head and washer: tightened and wiped off excess around the edges.
Oil pan: Toyota black FIPG.
Head half moons: Toyota black FIPG.
Head bolts / main and rod caps: light coating of straight 30 weight motor oil on threads and undersides of bolt heads/nuts.
Front and rear crank seals: grease on the lips.
Oil pump o-ring: a little grease to hold it in place.
Oil pump itself: packed with Vaseline.
Distributor o-ring: motor oil.
Exhaust studs: Permatex grey-colored anti-seize on the threads where the nuts screw on. Nothing where the studs screw into the head.
Last edited by flyingbrass; 03-08-2010 at 08:44 PM.
03-05-2010, 10:25 AM
#290
Registered User
Join Date: Jan 2010
Posts: 38
Likes: 0
Received 0 Likes
on
0 Posts
im curious do most of the installs put the head on then later put the timing cover on?
the only time ive ever done that was when replacing timing chain.
i can say this about sealants on timing cover install........use fresh or recently purchased sealant, give it plenty of time to cure 24-36 hours........or be in a hurry for a trip, run the truck right away. and leak oil on the way to colorado like the exxon valdez (a lot)
03-05-2010, 08:14 PM
#291
Registered User
Thread Starter
Opinions vary whether to do the timing cover or head first. If you install the cover first, you may get a better seal where the head sits on top of it. You're also less likely to accidentally ruin that part of the head gasket.
Putting the head on first makes installing the cam timing gear easier (just tape the tensioner back), plus you can check clearance around timing guides and adjust if necessary.
We didn't get much done. Most of the day was spent on a non-rebuild related tool shopping trip. However, I got the PAIR valve gasket from Toyota, and the motor mounts arrived.
Earlier I couldn't find a Toyota part number for only the rubber parts of the mounts. I couldn't even determine whether Toyota sells them. The ones from John's Foreign Engines (aka 22re.com and whatever other names), advertised as being the same parts Toyota sells except at a lower price, have part numbers stamped in each side: 12361-3505016 and 12361-54120.
Looking up 12361-54120 at 1sttoyotaparts shows it has been replaced (very common with older part numbers) by 12361-54121, which is listed in the OEM catalog as an "INSULATOR, ENGINE MO." MSRP is $45.84, and $33.07 (each) at 1sttoyotaparts.
12361-35050 also shows as "INSULATOR, ENGINE MO," MSRP $60.42, and $43.58 at 1sttoyotaparts.
Now I'm not so skeptical about these "cheap" $52 shipped for the pair replacements. Maybe they really are the same parts sold by dealers. If anyone has pictures of new mounts from Toyota, post them somewhere and let's compare. At any rate, now you have some part numbers as a starting point if you want to buy from Toyota.
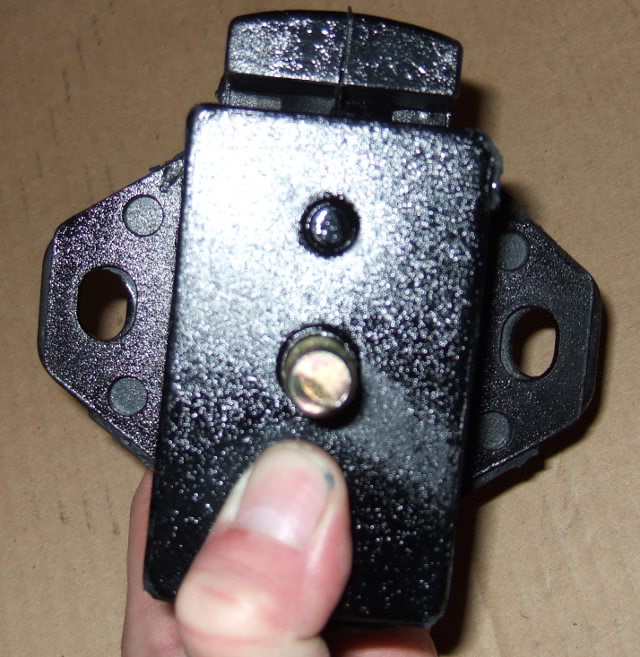
The distance between the bolt holes is slightly narrower than my old ones. The bolts fit through into the mount bracket in the truck, but barely, and even then were splayed out. I slightly enlarged the inner portion of the truck's mount holes, though there still isn't a lot of wiggle room. Might need to wallow them out a little more.
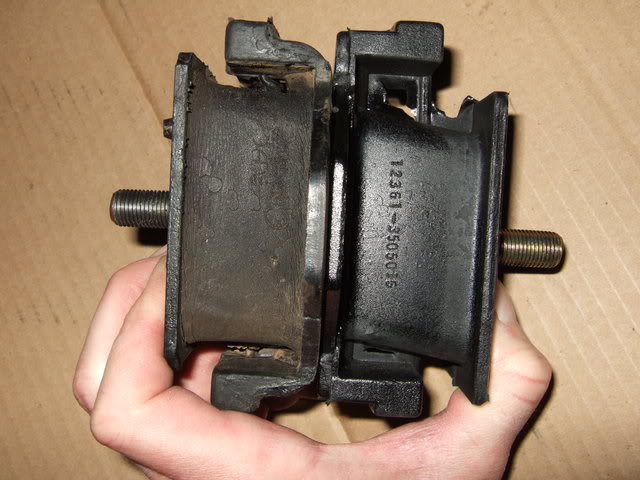
Here are some pictures of my original, tired factory mount compared to one from John's.
Held back to back to show the bolt hole spacing difference:
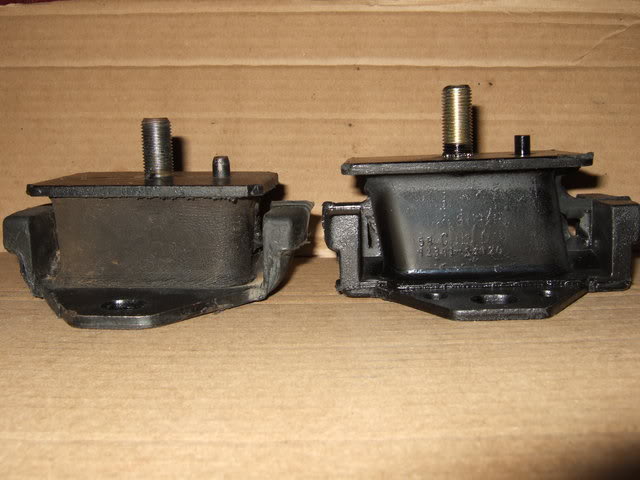
New mount rubber is angled. They fit on upside down from shown here, with the orginal "lean" upward. I'm assuming this is so they'll be relatively straight after taking the weight of the engine and settling in.
Note the height difference. I'm sure the originals were taller before supporting the engine for 23 years.
Putting the head on first makes installing the cam timing gear easier (just tape the tensioner back), plus you can check clearance around timing guides and adjust if necessary.
We didn't get much done. Most of the day was spent on a non-rebuild related tool shopping trip. However, I got the PAIR valve gasket from Toyota, and the motor mounts arrived.
Earlier I couldn't find a Toyota part number for only the rubber parts of the mounts. I couldn't even determine whether Toyota sells them. The ones from John's Foreign Engines (aka 22re.com and whatever other names), advertised as being the same parts Toyota sells except at a lower price, have part numbers stamped in each side: 12361-3505016 and 12361-54120.
Looking up 12361-54120 at 1sttoyotaparts shows it has been replaced (very common with older part numbers) by 12361-54121, which is listed in the OEM catalog as an "INSULATOR, ENGINE MO." MSRP is $45.84, and $33.07 (each) at 1sttoyotaparts.
12361-35050 also shows as "INSULATOR, ENGINE MO," MSRP $60.42, and $43.58 at 1sttoyotaparts.
Now I'm not so skeptical about these "cheap" $52 shipped for the pair replacements. Maybe they really are the same parts sold by dealers. If anyone has pictures of new mounts from Toyota, post them somewhere and let's compare. At any rate, now you have some part numbers as a starting point if you want to buy from Toyota.
The distance between the bolt holes is slightly narrower than my old ones. The bolts fit through into the mount bracket in the truck, but barely, and even then were splayed out. I slightly enlarged the inner portion of the truck's mount holes, though there still isn't a lot of wiggle room. Might need to wallow them out a little more.
Here are some pictures of my original, tired factory mount compared to one from John's.
Held back to back to show the bolt hole spacing difference:
New mount rubber is angled. They fit on upside down from shown here, with the orginal "lean" upward. I'm assuming this is so they'll be relatively straight after taking the weight of the engine and settling in.
Note the height difference. I'm sure the originals were taller before supporting the engine for 23 years.
Last edited by flyingbrass; 03-06-2010 at 12:46 AM.
03-05-2010, 09:47 PM
#292
Registered User
Join Date: Jan 2010
Posts: 38
Likes: 0
Received 0 Likes
on
0 Posts
i cant say too many times how important new sealant and 24-36 + hours curing time will be on sealing that timing cover if you have installed head first.........one of my huge mistakes years ago.
again great pics you are no doubt helping numerous people with the pics and info. keep up the good work.
my engine goes to the machine shop on monday.........
again great pics you are no doubt helping numerous people with the pics and info. keep up the good work.
my engine goes to the machine shop on monday.........
03-06-2010, 12:17 AM
#293
Registered User
Thread Starter
Makes sense to give RTV at least a day if possible to cure. FIPG too if you're not in a rush. The instructions in my box of FIPG say:
- Engine may be started in 1 to 2 hours.
- Hardens to become rubberlike in 15 to 16 hours
03-06-2010, 05:44 AM
#294
Registered User
Join Date: Jul 2009
Location: hubert nc
Posts: 1,151
Likes: 0
Received 0 Likes
on
0 Posts
ya, it just depends i have ocassions where i just slapped on the rtv and instanty added coolant and no leak, and sometime it seems like it need a day or two to dry out...
03-06-2010, 09:51 AM
#295
Registered User
Join Date: Jan 2010
Posts: 38
Likes: 0
Received 0 Likes
on
0 Posts
you spend all that time on a rebuild.........whats 36 hours curing time to be sure? been there done the rush job......... luckily god parents 2 states away had a large garage where i redid the job and waited till the sealant cured........then continued 5,000 mile trip. was well worth the wait for curing time..........
03-06-2010, 06:27 PM
#296
Registered User
Thread Starter
A pictorial summary of today:


I used the wet paper trick Iamsuperbleeder has popularized to remove the pilot bearing. Check out his Youtube video. It didn't go that easily for me, which I suspect may have been in part from not soaking the paper long enough.
An old head bolt is a reasonably close fit inside the bearing and probably would have worked. I gave up on it and switched to using a socket. Even that didn't make the bearing budge, so I got a bigger hammer. Bumping with a 4 lb. sledge (not hard blows), repeatedly adding wet paper finally hydraulicked it out in one piece. No grease splatters or mess, just a nice clean hole.
Here is Bleeder's video:
http://www.youtube.com/watch?v=1xuR7T8G1Ys
Got the new bearing installed. A 1/2" drive 22mm deep wall impact socket from Harbor Freight was the perfect size to tap it in. Cleaned the flywheel and pressure plate surfaces and installed the clutch. I used blue Loctite on the flywheel and pressure plate bolts.
To torque the flywheel bolts, I used tiohero's method of preventing it from turning: an old head bolt and a wrench. His thread is here. Borrowing his pic:

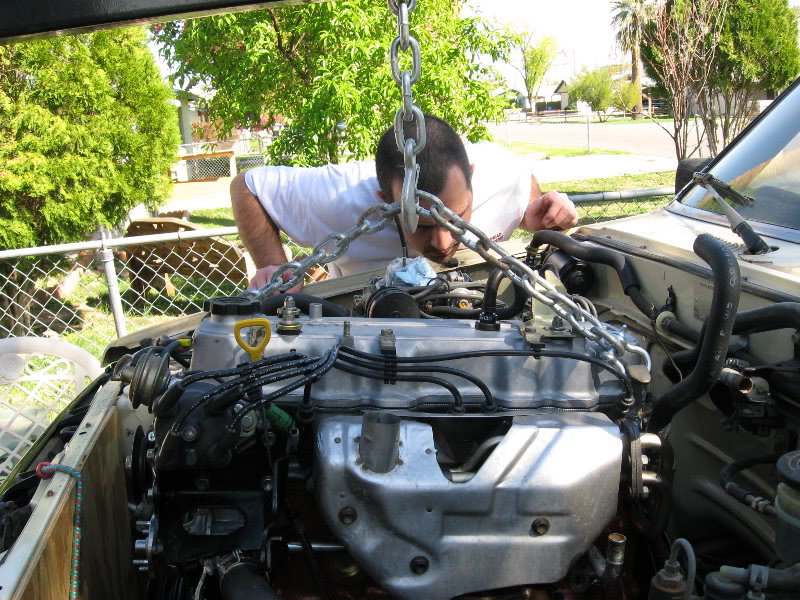
The big mistake of the day was trying to install the engine with the valve cover on. We tried to find the right combination of transmission and engine height to allow the oil pan to clear the front differential while keeping the engine low enough so it could mate with the tranny before the valve cover bumped into the heater hoses where they go into the firewall. Couldn't make it work. Plus, we were fighting a roll to the passenger side along with the rear of the engine being too low. A real pain.
We tried ratchet straps, but mine are the kind you can't ratchet to loosen in steps.
After a few hours of screwing with the thing, clouds rolled in and started raining. We set the engine on a pallet and covered it up. Rain is forecast for all day tomorrow.
So close, yet so far.
Edit: I forgot to mention that having the arm out to the longest setting makes the hoist too tippy. Even holding only a ~330 lb. engine, the back wheels want to come up at times. I'll move it in a notch when trying again.
I used the wet paper trick Iamsuperbleeder has popularized to remove the pilot bearing. Check out his Youtube video. It didn't go that easily for me, which I suspect may have been in part from not soaking the paper long enough.
An old head bolt is a reasonably close fit inside the bearing and probably would have worked. I gave up on it and switched to using a socket. Even that didn't make the bearing budge, so I got a bigger hammer. Bumping with a 4 lb. sledge (not hard blows), repeatedly adding wet paper finally hydraulicked it out in one piece. No grease splatters or mess, just a nice clean hole.
Here is Bleeder's video:
http://www.youtube.com/watch?v=1xuR7T8G1Ys
Got the new bearing installed. A 1/2" drive 22mm deep wall impact socket from Harbor Freight was the perfect size to tap it in. Cleaned the flywheel and pressure plate surfaces and installed the clutch. I used blue Loctite on the flywheel and pressure plate bolts.
To torque the flywheel bolts, I used tiohero's method of preventing it from turning: an old head bolt and a wrench. His thread is here. Borrowing his pic:
The big mistake of the day was trying to install the engine with the valve cover on. We tried to find the right combination of transmission and engine height to allow the oil pan to clear the front differential while keeping the engine low enough so it could mate with the tranny before the valve cover bumped into the heater hoses where they go into the firewall. Couldn't make it work. Plus, we were fighting a roll to the passenger side along with the rear of the engine being too low. A real pain.
We tried ratchet straps, but mine are the kind you can't ratchet to loosen in steps.
After a few hours of screwing with the thing, clouds rolled in and started raining. We set the engine on a pallet and covered it up. Rain is forecast for all day tomorrow.
So close, yet so far.
Edit: I forgot to mention that having the arm out to the longest setting makes the hoist too tippy. Even holding only a ~330 lb. engine, the back wheels want to come up at times. I'll move it in a notch when trying again.
Last edited by flyingbrass; 03-08-2010 at 09:17 PM.
03-06-2010, 07:30 PM
#298
Registered User
Join Date: Jan 2010
Posts: 38
Likes: 0
Received 0 Likes
on
0 Posts
hey Flyingbrass, what is FIPG ? it sounds like i could really use that "dries to a rubbery like" seal on the weber carb bottom plate to intake manifold. that never seals well by itself. is FIPG ok around gasoline?
great pic of that wrench holding the flywheel in place........i learned something new today
thanks
great pic of that wrench holding the flywheel in place........i learned something new today
thanks
03-06-2010, 08:23 PM
#299
Registered User
Thread Starter
I don't know if it's ok with gas. Guessing, I'd say probably not.
FIPG (form in place gasket) in this forum generally means Toyota's factory sealants. Black is for oil pans and such. I think orange is used for coolant, transmission fluid and gear oils, but don't hold me to that.
Most dealers charge an arm and a leg for the stuff. You can buy a tube of black (00295-00103) online from a discount Toyota parts seller for somewhere around $10 plus shipping. If it's the only thing you're ordering, shipping charges make it unreasonable. However, adding it to a larger order makes sense.
"The Right Stuff" is seemingly a similar product. It's available in most parts stores and also relatively expensive.
Both are different from typical RTV (room temperature vulcanizing) sealants. I don't know exactly how, only that they are. Maybe someone familiar with the chemistry will enlighten us.
When using regular RTV, "Ultra Grey" seems to be preferred for most things on Toyotas. Putney's Machine uses it everywhere that calls for sealant. Jim Brink (Toyota mechanic who used to be quite active online) recommends it in his timing chain replacement write-up. It's the only RTV partsdinosuar.com has for sale in their Toyota section. Marlin advises using it for sealing various transmission-related things.
Last edited by flyingbrass; 03-06-2010 at 08:43 PM.
03-07-2010, 12:45 AM
#300
Registered User
Join Date: Jan 2010
Location: Canada
Posts: 1
Likes: 0
Received 0 Likes
on
0 Posts
This thread is helping alot, not much of a poster online but I will upload all my rebuild pics.
One thing I have been getting mixed answers about is the breaking in of a rebuilt engine? Any help would be nice, and good job flyingbrass.
One thing I have been getting mixed answers about is the breaking in of a rebuilt engine? Any help would be nice, and good job flyingbrass.


