
22R Rebuild
 09-26-2009, 07:33 PM
#1
Registered User
Thread Starter

22R Rebuild
My 1986 22R pickup had a burned (or otherwise screwed) exhaust valve in #2 for years and recently blew the head gasket. It was a sneaky leak I noticed from coolant loss. One afternoon the temp gauge ran up to about the middle, which is higher than usual. Coolant was way low. I checked for leaks, found a small one, and patched it up hoping it was the problem while getting a sinking feeling in my stomach. Coolant loss increased, and then the oil obviously had some water in it. Ugh.
I bought this truck in 1993 with about 60K on it. Now it has 116K, but many of those miles have been short trips. It has been in use the entire time. The only times it has failed to start and take me wherever and back again over the 16 years I've owned it have been from dead batteries (they last 4-5 years here) and once when the starter contacts wore down. I can't complain.
This vehicle is presently my only transportation, and I intend to keep it. I had planned to eventually go through everything, including rebuilding the engine, when convenient and funds available. Wanted to buy a used motor and build it up to swap in. Money is very tight at the moment.
What to do? Redo only the head and cross my fingers that the bottom will be ok? Seems like a big gamble for all the work involved. After considering the options and advice received, I decided to strain my credit card to rebuild the engine myself. I hope I've made the right choice.
I'm not a mechanic and have never done any serious engine work before. I'm not sure I'd be willing to take this on if not for the info and support available online. I don't have a nice shop or even a covered garage. After pulling the engine in my driveway I plan to wheel it around to my back porch.
I borrowed an engine stand from my neighbor. An extraordinarily kind local Toyota aficionado not only loaned me his cherry picker but gave me some new Denso plugs, a Toyota oil filter, and a box full of misc. parts in case I need an extra something or other. Wow.
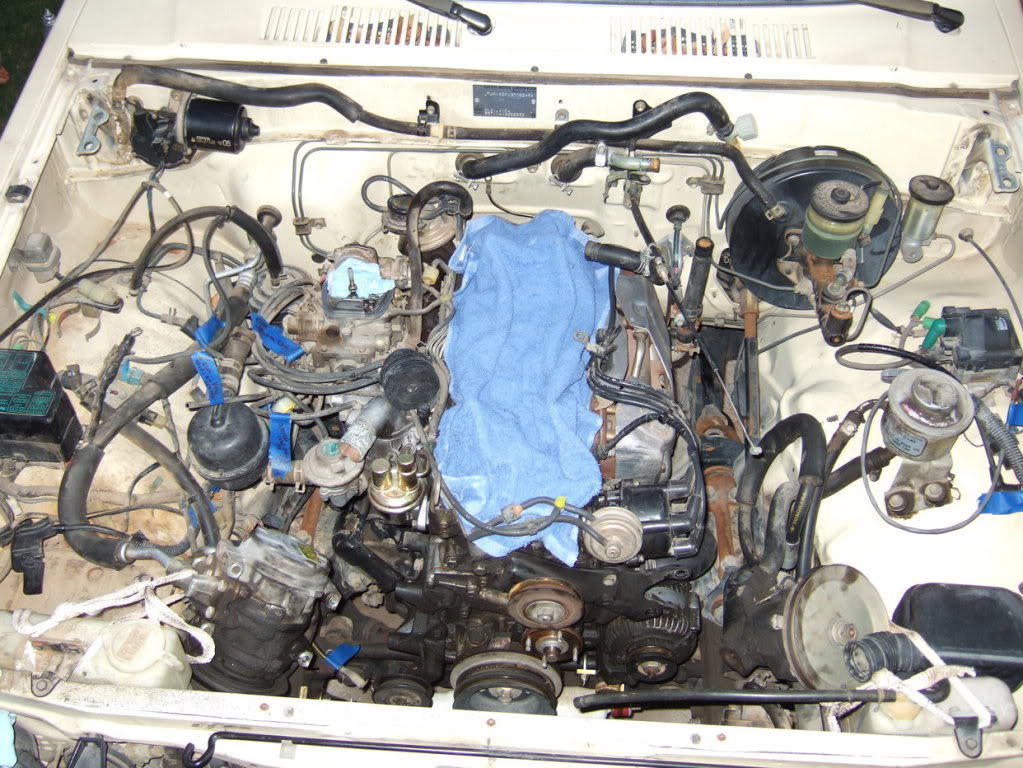
I got started pulling the engine with a friend's help. I'm taking pictures and labeling. I'm leaving intake and exhaust on. I want to disconnect only what is required to yank the thing out as whole as possible. Can't work very long in the sun here in the desert. The high here today according to my thermometer was 108. A few hours in the morning are tolerable. My driveway isn't shaded.
So far, everything is disconnected except the remaining bell housing bolts. The infamous top ones were a PITA. Reaching them from the top wasn't a viable option. I tried. Passenger side would have been the easiest to do that way, but with all the carb crap still practically impossible in this situation as tight as mine were. If you could find a slim enough cheater pipe to fit over a box end wrench with no angle at the end, and the bolts hadn't been in for 23 years, maybe... Then again, the 12 point box end may have just rounded the bolt. A wrench from the top on the driver side with exhaust manifold attached and other garbage in the way is a definite no go in my case.
We got the passenger side bolt loose with my friend's air gun with a stack of 1/2" Harbor Freight extensions and a HF impact "u-joint" adapter (they sell two kinds -- we used the ball and socket type -- the 3/8" and 1/2" combo set). As many have said before, stacking extensions takes the punch out of an impact gun. But, we eventually got it out. It took a lot of force to crack free.
On the driver side the setup we used wouldn't fit. So, we decided to lower the tranny. Unbolted the crossmember and took it down a bit. The impact gun at even 140 psi couldn't rattle through all those extensions enough to get that bolt free. With the transmission down that far, and so many extensions, we had a straight enough line on that side to put a cheater pipe on a flex handle with enough room to rotate. That cracked it loose after a strong grunt. So, those bolts are out.
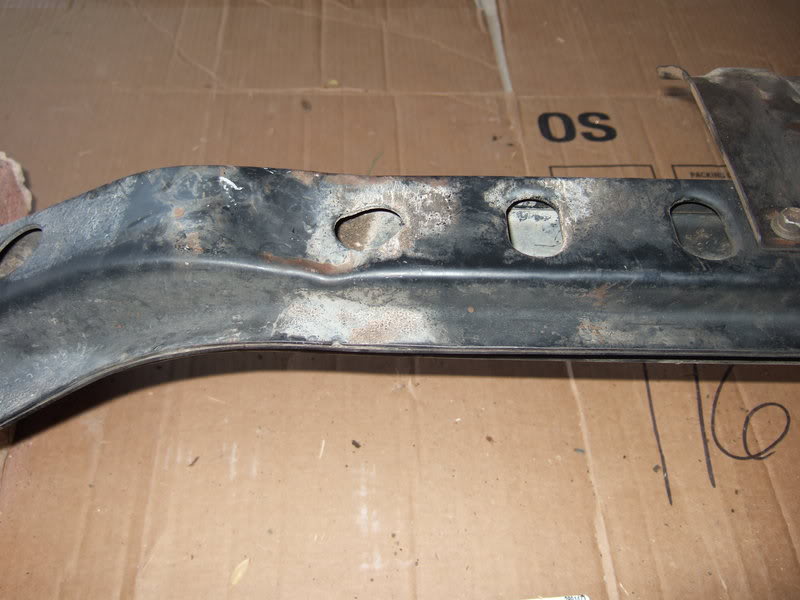
We went to bolt the transmission crossmember back up and found it wouldn't fit. It wouldn't no matter how we tried to start the bolts to tease it in. The thing is splayed out at least a good 3/16" side to side. All I can figure is the dent I put in it years ago created some outward tension that caused it to spring out when it was removed. I'll need to wallow out the insides of the holes to get it back on. I'm presently contemplating what tool to use for that job. Grinding bits in a drill didn't work, and the round hand files I have are small and fine-toothed. I'd like to find something that would work in my angle grinder.
I bought this truck in 1993 with about 60K on it. Now it has 116K, but many of those miles have been short trips. It has been in use the entire time. The only times it has failed to start and take me wherever and back again over the 16 years I've owned it have been from dead batteries (they last 4-5 years here) and once when the starter contacts wore down. I can't complain.
This vehicle is presently my only transportation, and I intend to keep it. I had planned to eventually go through everything, including rebuilding the engine, when convenient and funds available. Wanted to buy a used motor and build it up to swap in. Money is very tight at the moment.
What to do? Redo only the head and cross my fingers that the bottom will be ok? Seems like a big gamble for all the work involved. After considering the options and advice received, I decided to strain my credit card to rebuild the engine myself. I hope I've made the right choice.
I'm not a mechanic and have never done any serious engine work before. I'm not sure I'd be willing to take this on if not for the info and support available online. I don't have a nice shop or even a covered garage. After pulling the engine in my driveway I plan to wheel it around to my back porch.
I borrowed an engine stand from my neighbor. An extraordinarily kind local Toyota aficionado not only loaned me his cherry picker but gave me some new Denso plugs, a Toyota oil filter, and a box full of misc. parts in case I need an extra something or other. Wow.
I got started pulling the engine with a friend's help. I'm taking pictures and labeling. I'm leaving intake and exhaust on. I want to disconnect only what is required to yank the thing out as whole as possible. Can't work very long in the sun here in the desert. The high here today according to my thermometer was 108. A few hours in the morning are tolerable. My driveway isn't shaded.
So far, everything is disconnected except the remaining bell housing bolts. The infamous top ones were a PITA. Reaching them from the top wasn't a viable option. I tried. Passenger side would have been the easiest to do that way, but with all the carb crap still practically impossible in this situation as tight as mine were. If you could find a slim enough cheater pipe to fit over a box end wrench with no angle at the end, and the bolts hadn't been in for 23 years, maybe... Then again, the 12 point box end may have just rounded the bolt. A wrench from the top on the driver side with exhaust manifold attached and other garbage in the way is a definite no go in my case.
We got the passenger side bolt loose with my friend's air gun with a stack of 1/2" Harbor Freight extensions and a HF impact "u-joint" adapter (they sell two kinds -- we used the ball and socket type -- the 3/8" and 1/2" combo set). As many have said before, stacking extensions takes the punch out of an impact gun. But, we eventually got it out. It took a lot of force to crack free.
On the driver side the setup we used wouldn't fit. So, we decided to lower the tranny. Unbolted the crossmember and took it down a bit. The impact gun at even 140 psi couldn't rattle through all those extensions enough to get that bolt free. With the transmission down that far, and so many extensions, we had a straight enough line on that side to put a cheater pipe on a flex handle with enough room to rotate. That cracked it loose after a strong grunt. So, those bolts are out.
We went to bolt the transmission crossmember back up and found it wouldn't fit. It wouldn't no matter how we tried to start the bolts to tease it in. The thing is splayed out at least a good 3/16" side to side. All I can figure is the dent I put in it years ago created some outward tension that caused it to spring out when it was removed. I'll need to wallow out the insides of the holes to get it back on. I'm presently contemplating what tool to use for that job. Grinding bits in a drill didn't work, and the round hand files I have are small and fine-toothed. I'd like to find something that would work in my angle grinder.
Last edited by flyingbrass; 11-01-2009 at 03:20 AM.
 09-27-2009, 08:05 AM
#2
Registered User

Join Date: Aug 2009
Location: Marysville, Wa
Posts: 66
Likes: 0
Received 0 Likes
on
0 Posts
I'd suggest maybe throwing a small body lift on your truck. I know its more money, but it makes pulling and reconnecting the transmission so much easier. I have a 3inch bl and I can get to all the bolts easily. Just a thought. In fact with my small suspension lift and body lift, I didn't have to jack the truck up to take out the tranny when I swapped it a few months ago.
When your rebulding, make sure stuff is machined at a shop and to use the plastiguage stuff to make sure the bearing clearences are good.
If there was no lower end motor noise (the block), I would have suggested just have the head redone. Or to order a new engnbldr head with a cam. If there's nothing wrong with the lower end, it could run another 200,000 miles.
09-27-2009, 08:13 AM
#3
Registered User
yup x2 and dont skimp out on the head gasket, try to get a toyota oem one, supposidly their the best, it cost me 90 bucks to have my valve stem seals, and one valve replaced and all valves re-laped so it shouldnt be too much more to get it resurfaced if need be
09-27-2009, 08:16 AM
#4
Registered User
Join Date: Sep 2009
Location: northern california
Posts: 147
Likes: 0
Received 0 Likes
on
0 Posts
I just rebuilt my 22r . Im no mechanic but i pulled it off i used an engnbldr kit and a dvd i got on ebay that showed step by step rebuild for 15 bucks good luck and keep us informed
09-27-2009, 08:19 AM
#5
Registered User
oh and go to walmart and buy a $10 dollar cover its realllllllyy cheapo but itll work it has 5 poles i think? and you set em all up and it has some rope to keep from flying away, just somthin to think about so your not in direct sunlight, i kno it sucks, i do it all day ;( im in roofing construction lmao
09-27-2009, 08:33 AM
#7

buy everything from eb.he stands behind his stuff and makes things right if you have a problem.Also he dispenses great advice.The 22r is butt simple to rebuild.Get plastigauge and learn how to use it.I have used eb's head gaskets for a while withgreat results.Have machine shop make sure your deck is flat.Heads are too cheap to waste money having yours rebuilt.The 268 cam and o/s valve head from eb is the way I went.Not a huge increase,but noticable.You will probably have to bore oversize.Make sure your fan clutch and radiator are in good shape.Have witchunter clean your injectors.And whatever your budget is,double it.Easy rebuild,but money goes fast.Good luck.
Trending Topics
09-27-2009, 09:38 AM
#8
Registered User
Thread Starter
Several years ago I stopped at a convenience store on the way home. As I left the parking lot a loud ticking/tapping noise started. It was so loud I thought maybe a belt had broken, got stuck in something and was flopping around. Nope. Everything looked fine except for the tapping/ticking.
I pulled the valve cover and everything looked ok. Valve clearances were ok. I couldn't determine exactly where the noise was coming from. Seemed to be cylinders or lower. It persisted for months, then eventually went away.
Later, I got a compression tester:
1: 179
2: 135
3: 170
4: 182
A piece of paper held against the tailpipe gets sucked in, so the problem in #2 must be an exhaust valve.
I checked compression again a few months ago. #2 and #3 spark plugs were extremely difficult to remove. I cleaned the threads in the head as best I could (I don't have a thread chaser) and used new plugs with a smear of anti-seize, but reinstalling was just as ugly. Even working them in gradually, the plugs turned in so hard it was difficult to tell when they bottomed out. I'm sure those threads are ruined. I blame extra heat in that area due to the bad valve, which may also be why the head gasket finally went.
1: 170
2: 115, 115 wet: 132
3: 172
4: 190, 187
I thought about doing only the head and installing a new timing kit, but after tearing down that far pulling the block would only be a few more bolts. Might as well pull the whole engine so I can work on it in the shade on a stand. If the bottom is good, machine work won't cost much. If something is bad or marginal, I'll be glad I went through it when I had the opportunity. Either way, it will be fresh and not a constant source of worry.
After the shop has checked everything out I'll buy a master rebuild kit and other parts from Engnbldr. I haven't decided whether to use his head gasket or get one from Toyota. I'll take a look at the inside of my timing cover, but I'll probably get a new one. The part where the radiator hose fits on is pretty corroded. I'll use a new oil pump, water pump, and timing kit with steel backed guide.
I called a local cylinder head shop recommended by a friend of a friend. They want $329 for an exchange or to rebuild mine. I may ask whichever machine shop I decide to use for a ballpark figure on checking and fixing mine, but it's not worth spending much on.
A new stock head from Engnbldr is $400 shipped. I want his head with oversized valves and a 268 cam. I'm debating whether to spend the extra $200. I may go for it so I won't be kicking myself later.
We're supposed to have record high heat today. Might see about working on the crossmember. I won't have help again until Wednesday.
 09-30-2009, 02:01 PM
#10
Registered User
Thread Starter
I found a coarser, larger round file, elongated the crossmember bolt holes, and got it reattached. I should eventually replace it. The stock design isn't very good. A Budbuilt crossmember looks nice, but $200 is way too spendy for me. I'll keep an eye out for a used Budbuilt or other aftermarket crossmember. It's not worth spending much. What my truck needs most upgrade-wise is a good rear locker. Electric or ARB. I don't want an auto. I have rarely had clearance problems, but the open diffs are a hindrance.
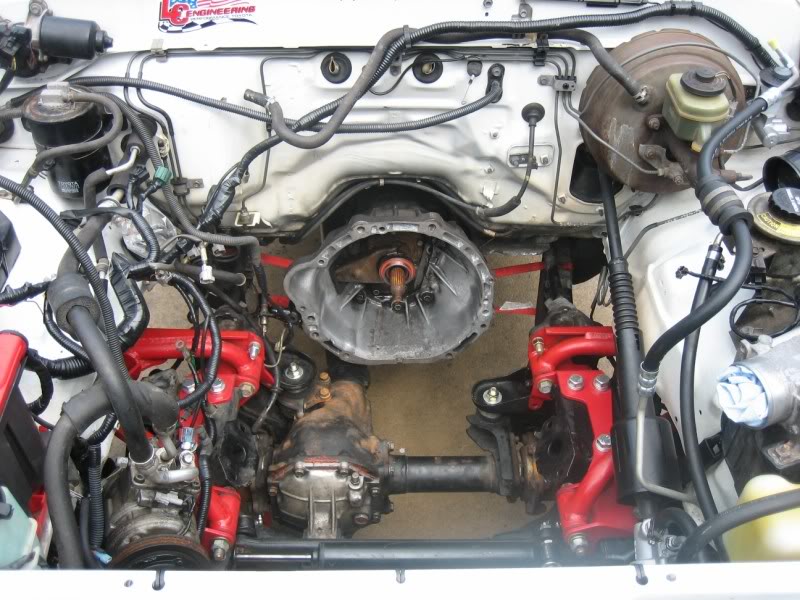
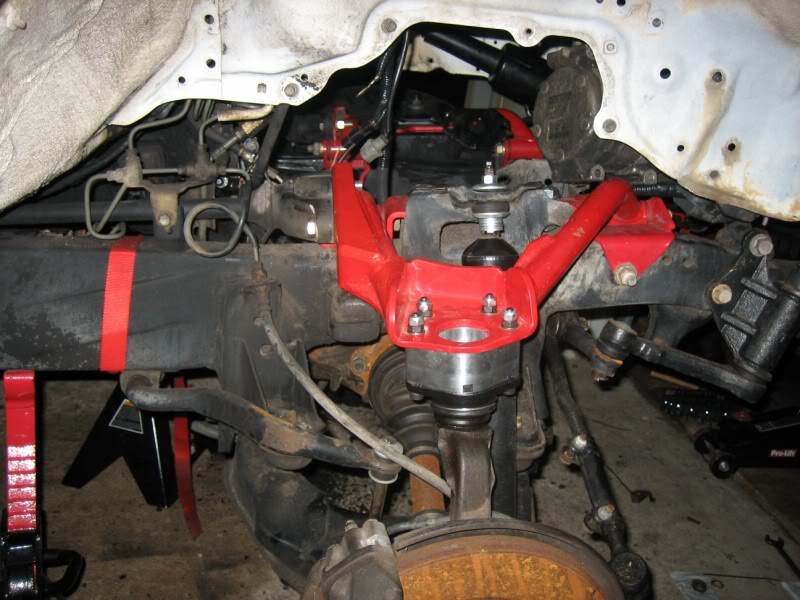
The engine came out easily. Don't forget the 17mm bolt by the clutch fork. I almost did. We took the tie off the a/c compressor shown in the previous pic. My friend worked the compressor around the passenger side engine mount as we brought the engine forward.
We jacked the tranny up some for the oil pan to clear the differential. No problem there. With the hoist raised to match, the engine slide right out after a few wiggles.
The clutch bolts came out easily. A smack with the palm of the hand on the end of a socket wrench broke them free. I used my electric impact gun on the flywheel bolts, though there are ways to handle them if an impact gun isn't available. I should have also used the gun on the 12mm bolts holding the engine/trans plate thing, because I partially rounded one of them using a socket wrench. When I slapped the end of the handle the dangling engine moved forward enough that the socket slid part way off the bolt. Not a big deal. I'll get a new bolt.
I'll order a 1200 lb. clutch kit from Marlin, along with new master and slave cylinders and a clutch fork boot. I replaced the master around 1995, but the slave is original. The slave is obviously leaking, and the master has left a few small spatters on things around the clutch pedal. Might as well replace them both. I'll call Marlin to order because from what I've read all too often they have problems sending the correct part when ordering online. I waited until I have access to my old clutch in case they ask questions about mine.
If anyone wants pictures of something in particular as I go through this, let me know. My setup is original. Pictures may be of help to others trying to piece together a carbed engine of this vintage that previous owners hacked up. Or, if you have a bunch of parts in a pile and don't know what goes where.
Just don't ask me what all the emissions components are actually supposed to accomplish. If I lived in a freer county, I'd do some research and tear most of this crap out. I'd keep the EGR and the HAC system as well if it doesn't depend on too many other things. Maybe another gadget or two. And, I'd still probably blow just as clean during the test without that extra junk.
On the way out. Note the thin plywood placed in front of the a/c condenser to prevent the engine from banging into it. It wasn't needed as the situation turned out, but may have been if we had to get rough.
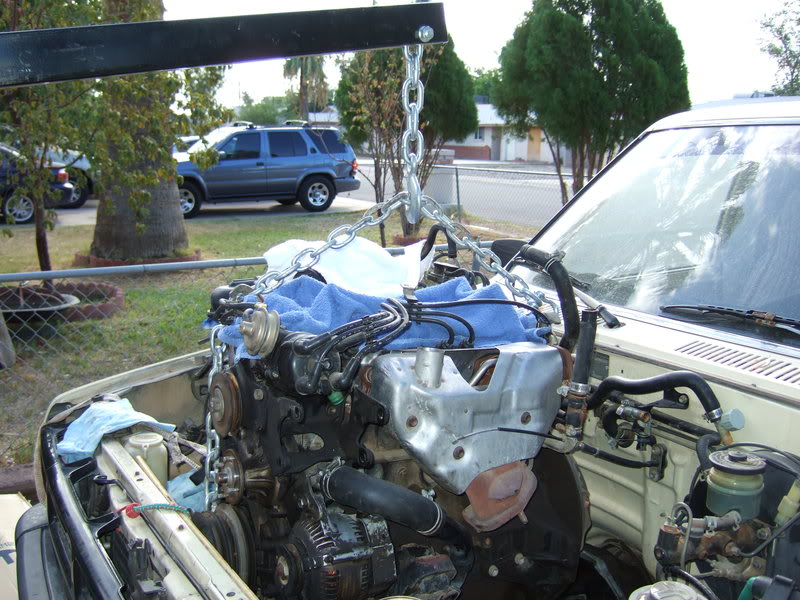
We raised the transmission this much to pull the engine. I thought I should keep track so I can position it about the same for reinstallation. We later propped up the bellhousing with a stand and removed the jack. The engine rolled slightly to the passenger side as it came off. Might need to use a ratchet strap to rotate it back to install.

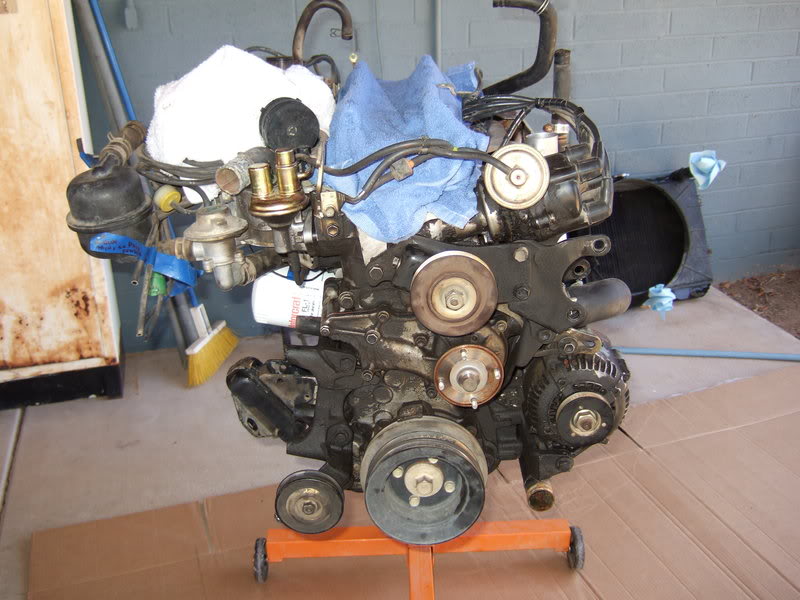
Ready to take apart.
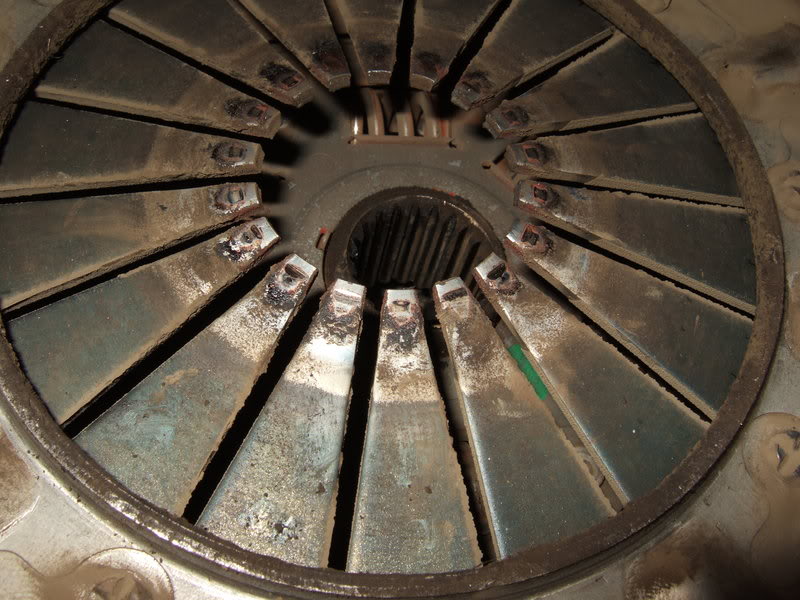
Wear on clutch plate fingers. This is the original clutch with 116K miles.
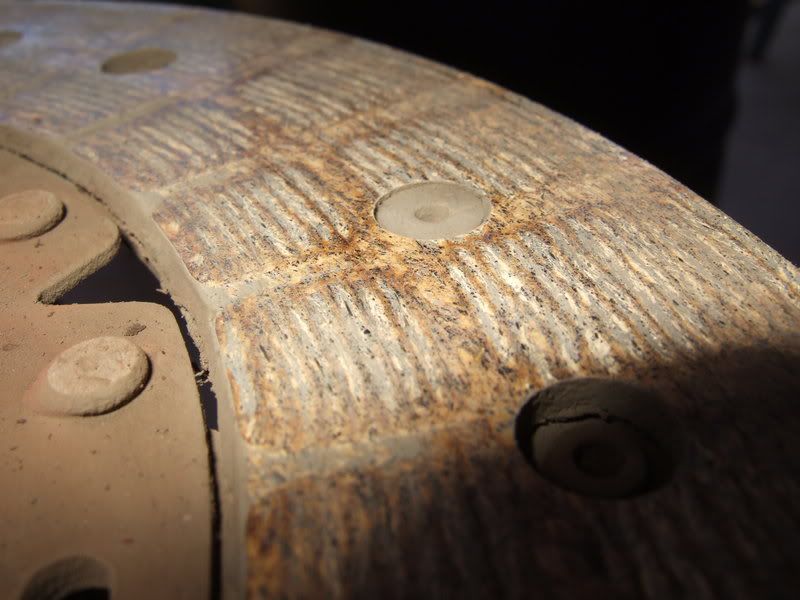
Clutch disk.
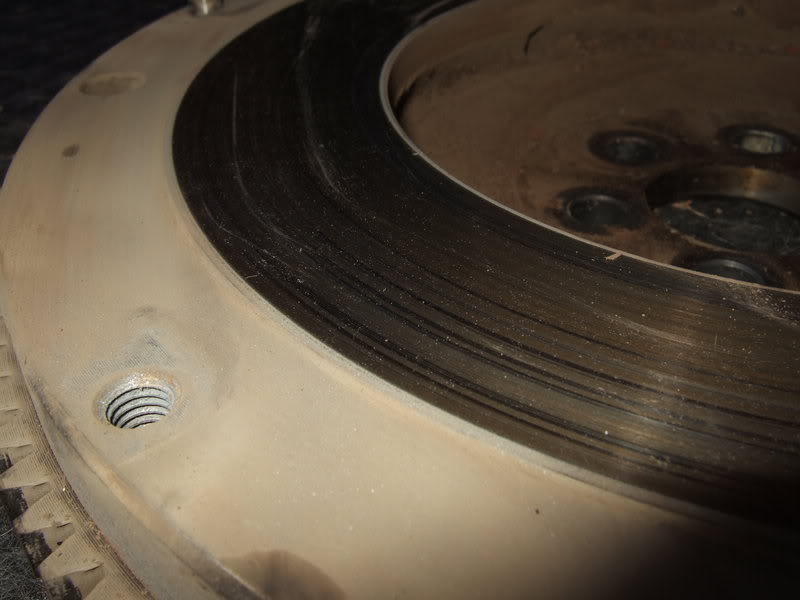
Flywheel.
The engine came out easily. Don't forget the 17mm bolt by the clutch fork. I almost did. We took the tie off the a/c compressor shown in the previous pic. My friend worked the compressor around the passenger side engine mount as we brought the engine forward.
We jacked the tranny up some for the oil pan to clear the differential. No problem there. With the hoist raised to match, the engine slide right out after a few wiggles.
The clutch bolts came out easily. A smack with the palm of the hand on the end of a socket wrench broke them free. I used my electric impact gun on the flywheel bolts, though there are ways to handle them if an impact gun isn't available. I should have also used the gun on the 12mm bolts holding the engine/trans plate thing, because I partially rounded one of them using a socket wrench. When I slapped the end of the handle the dangling engine moved forward enough that the socket slid part way off the bolt. Not a big deal. I'll get a new bolt.
I'll order a 1200 lb. clutch kit from Marlin, along with new master and slave cylinders and a clutch fork boot. I replaced the master around 1995, but the slave is original. The slave is obviously leaking, and the master has left a few small spatters on things around the clutch pedal. Might as well replace them both. I'll call Marlin to order because from what I've read all too often they have problems sending the correct part when ordering online. I waited until I have access to my old clutch in case they ask questions about mine.
If anyone wants pictures of something in particular as I go through this, let me know. My setup is original. Pictures may be of help to others trying to piece together a carbed engine of this vintage that previous owners hacked up. Or, if you have a bunch of parts in a pile and don't know what goes where.
Just don't ask me what all the emissions components are actually supposed to accomplish. If I lived in a freer county, I'd do some research and tear most of this crap out. I'd keep the EGR and the HAC system as well if it doesn't depend on too many other things. Maybe another gadget or two. And, I'd still probably blow just as clean during the test without that extra junk.
On the way out. Note the thin plywood placed in front of the a/c condenser to prevent the engine from banging into it. It wasn't needed as the situation turned out, but may have been if we had to get rough.
We raised the transmission this much to pull the engine. I thought I should keep track so I can position it about the same for reinstallation. We later propped up the bellhousing with a stand and removed the jack. The engine rolled slightly to the passenger side as it came off. Might need to use a ratchet strap to rotate it back to install.
Ready to take apart.
Wear on clutch plate fingers. This is the original clutch with 116K miles.
Clutch disk.
Flywheel.
Last edited by flyingbrass; 09-30-2009 at 02:24 PM.
09-30-2009, 03:02 PM
#11
Contributing Member
ah, that clutch still had life in it
reuse that thing!

lol, okay okay, just kidd'n
looks like fun; been there, done that; it's a fun adventure
keep up the good work!
btw, it might be easier to just wrap a ratchet strap around the frame rails and then under the trans, to keep it supported; makes it a little easier if you have to roll the truck out of the way somewhere, lol
you can kinda see what I'm talking about in these pics of mine:
reuse that thing!
lol, okay okay, just kidd'n
looks like fun; been there, done that; it's a fun adventure
keep up the good work!
btw, it might be easier to just wrap a ratchet strap around the frame rails and then under the trans, to keep it supported; makes it a little easier if you have to roll the truck out of the way somewhere, lol
you can kinda see what I'm talking about in these pics of mine:
Last edited by iamsuperbleeder; 09-30-2009 at 03:07 PM.
09-30-2009, 04:01 PM
#12
Registered User
Thread Starter
Iamsuperbleeder, your rebuild thread is very inspiring. You did a a great job documenting with pictures along the way. Threads as thorough as yours help reduce the intimidation factor for those of us stepping into this for the first time.
 09-30-2009, 06:23 PM
#16
Registered User
Thread Starter
Benny, label everything you take off. If you have the slightest doubt of what anything is or where it goes, label both sides. Snap a picture before disconnecting if you can. Take pictures before doing anything and all along the way. I'm sure I'll need to refer to my pics somewhere along the line.
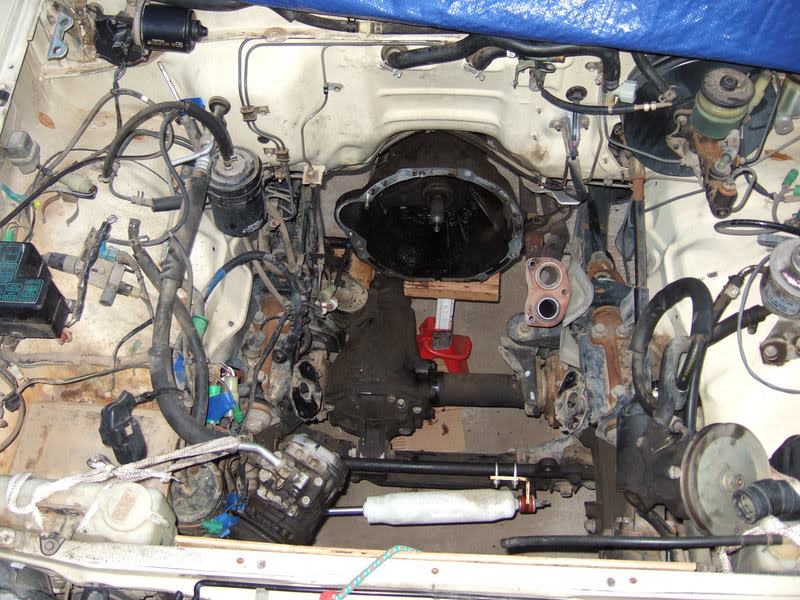
There really isn't all that much to disconnect and keep track of on these carbed engines if you pull the engine out whole as I did. The mess looks scary in the engine compartment, but less so when out on a stand.
There really isn't all that much to disconnect and keep track of on these carbed engines if you pull the engine out whole as I did. The mess looks scary in the engine compartment, but less so when out on a stand.
09-30-2009, 06:35 PM
#17
Registered User
Benny, label everything you take off. If you have the slightest doubt of what anything is or where it goes, label both sides. Snap a picture before disconnecting if you can. Take pictures before doing anything and all along the way. I'm sure I'll need to refer to my pics somewhere along the line.
09-30-2009, 07:24 PM
#18
Registered User
Thread Starter
Back up your pictures. Keep them in the camera's memory if possible, but after transferring to your computer's hard drive(s), copy them to somewhere else Could be an external hard drive, USB stick or whatever. This applies to anything important you want to keep. You wouldn't want to lose your pics from a hard drive crash, or for those of you running Windows, an OS hiccup that might inspire a reinstallation.
10-03-2009, 01:54 AM
#19
Registered User
Thread Starter
I'll get started taking this apart soon.
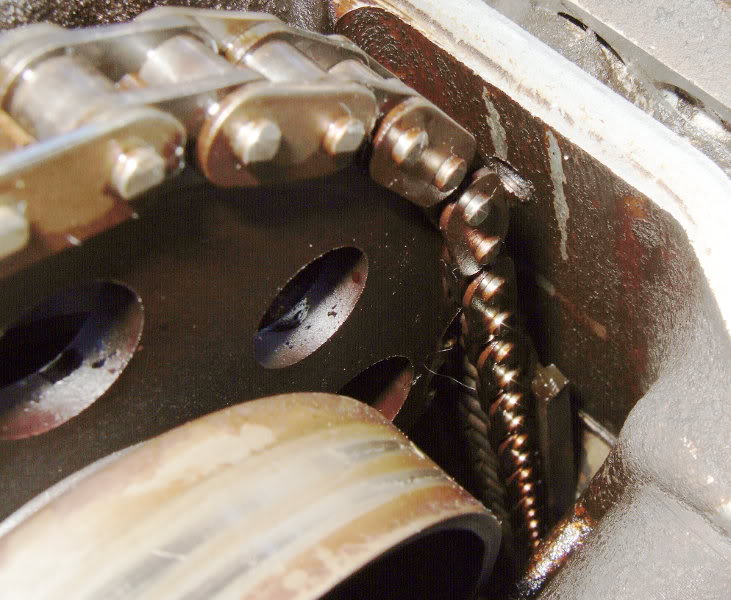
The timing chain guide is chipped off at the top on the driver side, but look how the chain has apparently contacted the head. How did that happen? Strange.
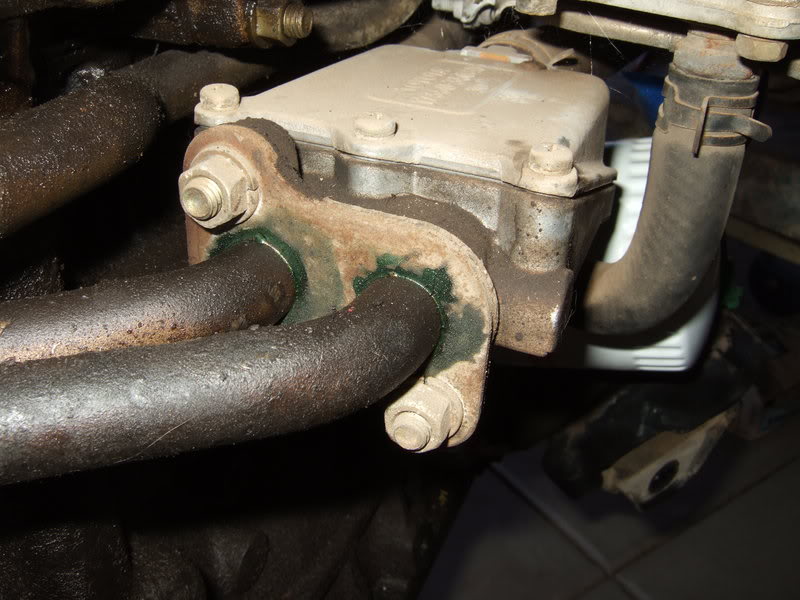
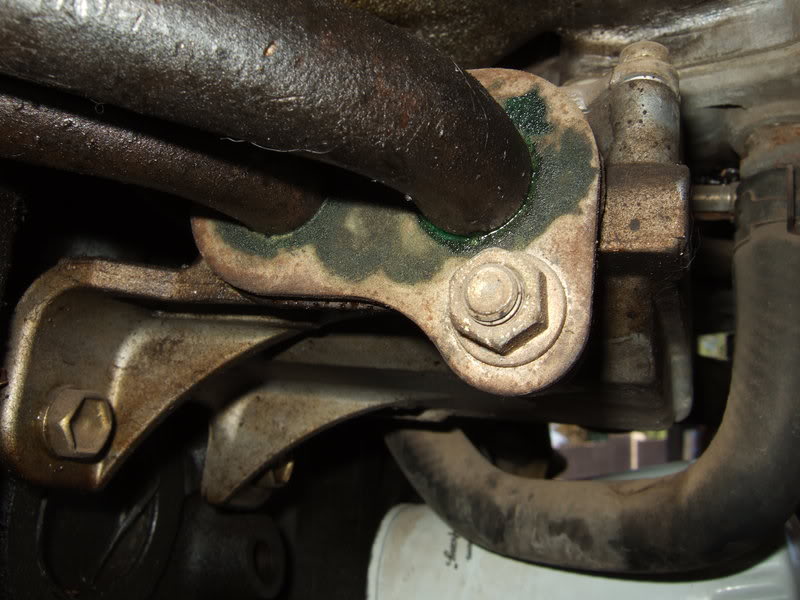
The pipes running to whatever that thing is called on the intake side under the carb seem to be weeping, and not from the gasket. I guess I'll have to see what they look like on the inside and then go from there.
The timing chain guide is chipped off at the top on the driver side, but look how the chain has apparently contacted the head. How did that happen? Strange.
The pipes running to whatever that thing is called on the intake side under the carb seem to be weeping, and not from the gasket. I guess I'll have to see what they look like on the inside and then go from there.
Last edited by flyingbrass; 10-03-2009 at 02:03 AM.
10-05-2009, 03:27 PM
#20
Registered User
Thread Starter
The 2 pipes above attached to the reed valve (PAIR). Coolant came from something else.
I'm having trouble getting the intake off. I removed everything necessary, but it won't budge. The manual says 6 bolts and 2 nuts. Check. The carbureted intake apparently doesn't have the allen bolt I've read about.
I've looked around the intake several times and don't see anything holding it on. I've yanked on it hard and also tried tapping around the edges using a socket extension and hammer. It hasn't budged.
Are these old intakes usually stuck on so hard? What should I do?


