
DIY soft top finally under way!
 08-20-2006, 10:51 AM
#1
Registered User
Thread Starter
Join Date: Apr 2006
Location: Houston, TX
Posts: 184
Likes: 0
Received 0 Likes
on
0 Posts
DIY soft top finally under way!
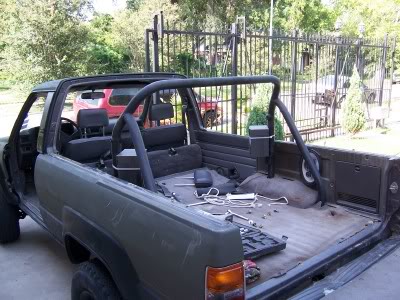
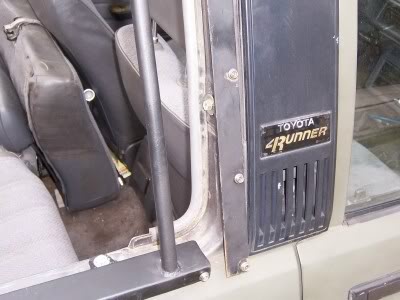
Ok.. I finally am starting work on my can back-like soft top for my 4Runner. I have all stuff I need (metal, vinyl windows, Sunbrella, snaps, etc). Progress is great so far. I have built the side rails and the "snap strip" that goes around the cab. Tuesday I will be adding the snaps. My bender should come UPS by Wedensday, then I can bend the ribs and finish the upper frame. Then comes the sewing. I will hopefully have the whole thing done in less than 2 weeks from now (progress will slow a little, school starts monday). So...here come the pictures. Enjoy! 
Before picture:
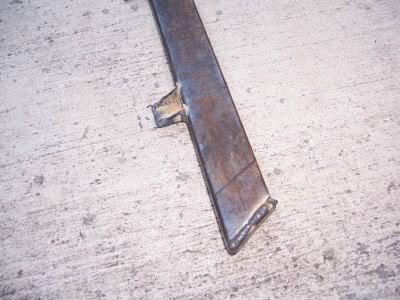
Side rail bracket pre-cleanup and paint:
Completed (except snaps and weather stripping) siderail:
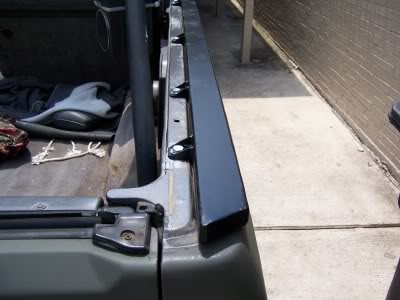
"Snap strip" detail:
Ok...I hope the pictures worked. I will add more in a few days.
Before picture:
Side rail bracket pre-cleanup and paint:
Completed (except snaps and weather stripping) siderail:
"Snap strip" detail:
Ok...I hope the pictures worked. I will add more in a few days.
Last edited by marty4runner; 08-20-2006 at 10:56 AM.


 02-23-2007, 09:58 AM
#3
Registered User
Thread Starter
Join Date: Apr 2006
Location: Houston, TX
Posts: 184
Likes: 0
Received 0 Likes
on
0 Posts
Finally some progress
Well, many months have gone by and I haven't done any work on my soft top (I've been very busy and lazy). Now that I have some time, I can finish this durn project. So here are some pics of my (almost) complete frame. I ended up using solid bar as I don't have a proper tubing bender. It is a little heavier that way, but plenty strong for the roof rack (I can stand on it with minimal wiggling). Everything bolts into the stock hard top mounting holes. When done, it will be almost an exact copy of a Can-Back. I am getting with my girlfriend's mother this weekend to sew up the Sunbrella top. I will post pics early next week when everything will hopefully be done. Wish me luck on the sewing....I'm scared.
Rock on!


Oh, and let me add. I has cost around $200. The metal fab skills involved are minimal. I will let you know about the sewing later, but I think it will require the most precision as I do not want it to flap in the wind or be so saggy that the top fills with a big puddle when it rains (I have owned a Jeep and this was a constant problem). The top will also be designed to be fully adjustable in order to account for expanding or contracting according to the temperature. I am excited and will have a perfectly good hard top for sale (if it's worth anything to anyone) in Houston soon. Ok, chow
Rock on!
Oh, and let me add. I has cost around $200. The metal fab skills involved are minimal. I will let you know about the sewing later, but I think it will require the most precision as I do not want it to flap in the wind or be so saggy that the top fills with a big puddle when it rains (I have owned a Jeep and this was a constant problem). The top will also be designed to be fully adjustable in order to account for expanding or contracting according to the temperature. I am excited and will have a perfectly good hard top for sale (if it's worth anything to anyone) in Houston soon. Ok, chow
Last edited by marty4runner; 02-23-2007 at 10:06 AM.
02-23-2007, 10:05 AM
#4
Contributing Member
Join Date: Jun 2006
Posts: 4,047
Likes: 0
Received 0 Likes
on
0 Posts
Looks great!!
Nice work! I can't wait to see it all finished up.
AS far as how the rails and snap strips are held on...what 2-4 bolts per side to take the frame off?
Whats your total estimated cost in materials?
Nice work! I can't wait to see it all finished up.
AS far as how the rails and snap strips are held on...what 2-4 bolts per side to take the frame off?
Whats your total estimated cost in materials?
02-23-2007, 10:11 AM
#5
Registered User
Thread Starter
Join Date: Apr 2006
Location: Houston, TX
Posts: 184
Likes: 0
Received 0 Likes
on
0 Posts
Cost is around $200. All prices are ballpark...metal: $80, Sunbrella fabric and smoked vinyl window material: $60-70, the rest is in snaps, straps, ladderlock buckles, and other various hardware. Rocko, I'm not sure what you mean about the bolts per side but the frame is completely bolted into (including the snap strap) all of the stock holes for the original hard top.
02-23-2007, 11:23 AM
#6
Registered User
Join Date: Jun 2006
Location: ashburn va
Posts: 76
Likes: 0
Received 0 Likes
on
0 Posts
one option for the sides where you would put the snaps are "common sense snaps" i built a top like yours for my tacoma and i used them. i liked them better than snaps but the are a little more expensive
Trending Topics
02-24-2007, 05:15 AM
#8
Contributing Member
Join Date: Jun 2006
Posts: 4,047
Likes: 0
Received 0 Likes
on
0 Posts
Marty -
I mean if you just wanted to run topless, also top frameless, how many bolts are there to take it off?
I don't have a any thing except my 04 D cab, so no hard tops for me.
I mean if you just wanted to run topless, also top frameless, how many bolts are there to take it off?
I don't have a any thing except my 04 D cab, so no hard tops for me.
02-24-2007, 08:51 AM
#9
Registered User
Thread Starter
Join Date: Apr 2006
Location: Houston, TX
Posts: 184
Likes: 0
Received 0 Likes
on
0 Posts
gotcha-
I'm not looking at it right now but I think there are 4 per side and 6 for the whole strip around the cab. So...14 bolts total.
I'm not looking at it right now but I think there are 4 per side and 6 for the whole strip around the cab. So...14 bolts total.
Last edited by marty4runner; 02-24-2007 at 10:17 AM.
02-25-2007, 05:20 AM
#11
Registered User
Thread Starter
Join Date: Apr 2006
Location: Houston, TX
Posts: 184
Likes: 0
Received 0 Likes
on
0 Posts
Wow, this is going to be a lot of work. We took all measurements possible and talked about the little details. Actual construction will now begin on Thursday. I'm excited.
02-26-2007, 08:48 AM
#12
Registered User
Join Date: Jun 2006
Location: ashburn va
Posts: 76
Likes: 0
Received 0 Likes
on
0 Posts
03-02-2007, 01:39 PM
#13
Registered User
Thread Starter
Join Date: Apr 2006
Location: Houston, TX
Posts: 184
Likes: 0
Received 0 Likes
on
0 Posts
Just an update for all interested. We got some sewing done and took more measurements. Things will hopefully start coming together over the weekend. There are alot of little details involved in doing this right. When done, it should come out pretty much exactly like a can-back for about 1/6 of the price.
I have some ideas about how I am going to attach a roof rack, but have never seen a Can-Back with one in person. Does anyone have any closeups of the roof rack mounting on their can-back? Thanks!
I have some ideas about how I am going to attach a roof rack, but have never seen a Can-Back with one in person. Does anyone have any closeups of the roof rack mounting on their can-back? Thanks!
03-02-2007, 07:07 PM
#14
Contributing Member
Join Date: Jul 2004
Location: Ft. Collins, Co
Posts: 988
Likes: 0
Received 0 Likes
on
0 Posts
Hey man, props on getting an old project back up and running. I still have a half completed frame for my soft top that I started in like 05. I am really wanting to make some half doors with canvas this spring and am worried about the sewing.
Please post pics of the sewing and describe any hickups you ran into. How do you sew in the windows, and what kind of machine are you using?(heavy duty?)
Thanks in advance!
Please post pics of the sewing and describe any hickups you ran into. How do you sew in the windows, and what kind of machine are you using?(heavy duty?)
Thanks in advance!
03-03-2007, 09:08 AM
#15
Registered User
Thread Starter
Join Date: Apr 2006
Location: Houston, TX
Posts: 184
Likes: 0
Received 0 Likes
on
0 Posts
I forget the brand of machine, but it's fairly fancy. My friend just made a simple canopy top for his flatbed rat car 78 Mercedes diesel and sewed it with some el cheapo machine his g-friend had around. the results were pretty good. I think the big difference will be in the needle and thread. I am using a #16 needle with heavy duty upholstery thread. The upholstery thread is pretty thick and should hold up quite well to the elements without stretching or breaking.
Some canvas doors would be really cool. I've been thinking about that myself. The sewing would be real easy since it would be all flat. I would just fold over the perimeter 2 or 3 times so that the last inch or so, where the snaps would be mounted, will be very strong, and double stitch it that way (a seam about 1 mm from the very edge and another at the other end of the folded over part. then throw in some snaps and snap it onto the frame. I will post some stitching details later on. I don't think I will post many pictures until it's done. Hopefully we will get to work on it Sunday.
Wow that was long.....
Oh, and for the windows: they will be mounted on the inside of the vanvas. The surrounding canvas will be doubled over (as described above) and double stitched to the window. The machine should have no problem going through the window, it's not TOO thick. I'm not sure if you can tell in this picture, but here's a Can-Back window on a Blazer: http://www.coloradok5.com/reviewpics/canbackrollup.jpg
Last edited by marty4runner; 03-03-2007 at 09:11 AM.
03-03-2007, 08:43 PM
#16
Contributing Member
Join Date: Jul 2004
Location: Ft. Collins, Co
Posts: 988
Likes: 0
Received 0 Likes
on
0 Posts
Cool man, thanks for sharing so far. Your top is looking pretty sweet so far. Hopefully I can get my project up and running in the spring. I want to impress anyone and everyone who has ever seen half doors before, and I plan on haveing them as my permanent doors(totally functional/practical).
03-03-2007, 08:58 PM
#17
Registered User
Join Date: Feb 2007
Location: Kansas City, MO
Posts: 135
Likes: 0
Received 0 Likes
on
0 Posts


