L trim removal on 1st gen runner?
 12-18-2006, 10:17 AM
#1
Registered User
Thread Starter
Join Date: Feb 2006
Location: CT
Posts: 455
Likes: 0
Received 0 Likes
on
0 Posts
L trim removal on 1st gen runner?
Has anyone here ever done it? I am considering buying a new set for my runner but if it requires me to remove the side window then I think I can live with the rust. thanks
 12-18-2006, 10:53 AM
#2
Registered User
I believe the entire side window frames have to come out. The bolts to the L-strips are hidden underneath. I'm in the same situation with mine.
BTW: Does anyone know what holds on the black trim pieces (the ones with the 4Runner name plaque on them) on the B-pillars? I can't find any screws or snaps to remove them.
BTW: Does anyone know what holds on the black trim pieces (the ones with the 4Runner name plaque on them) on the B-pillars? I can't find any screws or snaps to remove them.
12-18-2006, 10:59 AM
#3
Contributing Member
Join Date: Mar 2005
Location: WA ,monroe
Posts: 1,871
Likes: 0
Received 0 Likes
on
0 Posts
have a look at my painting thread. this was done during the hot summer weather so you will need a hairdryer or heat gun to get them out for the cold weather..you also need to get some windshield butyl tape from napa or a glass shop to put them back in..
Last edited by DudeBud; 12-19-2006 at 11:26 AM.
12-18-2006, 11:01 AM
#4
Registered User
The L trim rusts where the spot welds are for the brackets that the sheet metal screws go in to...
To get to the L trim you have to FIRST remove the sliding window.
Its basically held in by super duty double stick tape..
Its pretty easy to do if the topper is OFF - then simply wedge a screw driver in between the window frame and start prying...
I havent done it with the topper ON however.
The B pillar is held on by 6 clips.
As I recall some slid up/down, others slide L/R.
I last took mine off in like 1990 when it was kinda new. I busted one of the clips but it stays on OK w/o it.
I recall wedging something (plastic spatuala) int here and taking a peek inside...
Now that these trucks are so old I bet the plastic is very brittle...
12-18-2006, 12:18 PM
#5
Registered User

Join Date: Sep 2006
Location: South
Posts: 2,094
Likes: 0
Received 0 Likes
on
0 Posts
Yeah the B pillar is held on by those annoying plastic clips. Some are the kind that you pop in and break off to get out, others slide up and out. Could never find the clips at any store, but plain old body/fender plastic clips work great with a little trimming to get em to stay. Plus, you get like 20 for $3 so you have extra if they come off.
But it'll hold with only 2 or 3 clips intact if it comes down to it.
But it'll hold with only 2 or 3 clips intact if it comes down to it.
12-18-2006, 12:47 PM
#6
Registered User

Join Date: Dec 2003
Location: Minnesota
Posts: 792
Likes: 0
Received 0 Likes
on
0 Posts
Pulling the windows is easier with the topper on, in my opinion. Use a box cutter to cut the glue. Use a putty knife to pry the window out. Once out, clean the window and mounting point in prep for the new window clue.
The L-trims come off with three screws, if I remember correctly. New onces may still be available from the dealer. Otherwise, check with www.toyotafiberglass.com for 'glass ones.
The L-trims come off with three screws, if I remember correctly. New onces may still be available from the dealer. Otherwise, check with www.toyotafiberglass.com for 'glass ones.
12-18-2006, 12:58 PM
#7
Registered User
I should clarify - the ONLY time I actually physically pulled the window out it was on a Gen1 that we were parting so the topper was off and it took seconds per side.
As the link in the pics from DudeBud shows - its pretty easy with the top ON...
As the link in the pics from DudeBud shows - its pretty easy with the top ON...
Trending Topics
12-18-2006, 02:24 PM
#8
Registered User
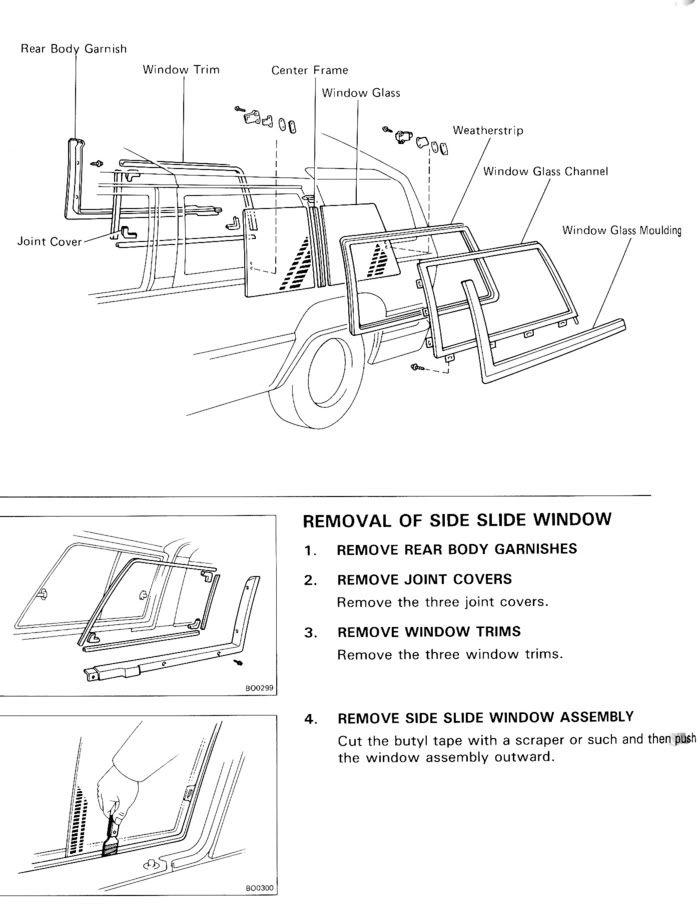
The part called window glass channel has screws going through it into the back of the L shaped trim. The hardest part is cutting through the adhesive which holds the window in.
Last edited by 4runnerx3; 12-18-2006 at 02:27 PM.
12-18-2006, 04:45 PM
#9
http://www.toyotafiberglass.com/l_trim_install.htm

we are the ONLY Supplier/Manufacture of these FIBERGLASS pieces .
we are the ONLY Supplier/Manufacture of these FIBERGLASS pieces .
Last edited by slacker; 12-18-2006 at 04:51 PM.
12-19-2006, 03:20 AM
#10
Registered User
Thread Starter
Join Date: Feb 2006
Location: CT
Posts: 455
Likes: 0
Received 0 Likes
on
0 Posts
Lotta help here guys. Thanks. I think I'm gonna tackle it!
Should I plan on replacing anything else like the weatherstripping?
Also where do I get that tape/adhesive?
Should I plan on replacing anything else like the weatherstripping?
Also where do I get that tape/adhesive?
Last edited by mtrdrms; 12-19-2006 at 03:24 AM.
12-21-2006, 06:39 AM
#14
Contributing Member

I just did this over the summer and its pretty easy to do.
VERY IMPORTANT
Clean off ALL of the old butyl before you try and reinstall the new window. Use alcohol thats what worked for me.
Press the new butyl on REALLLY hard into the top for a few minutes on each side. Don't touch it and allow as little dirt as possible to attract on the butyl before you put the top back on the truck.
12-22-2006, 10:54 PM
#16
Registered User

It's very easy to get hte old window out, let the truck sit in the sun, use a big flat screwdriver, and pry it out gently from the back to the front, easy as pie!
10-27-2015, 06:21 AM
#17
Registered User

Join Date: Oct 2015
Location: Maine for now
Posts: 8
Likes: 0
Received 0 Likes
on
0 Posts
L Trim
My 87 4runner has made 26 trips from East Coast to the Rockies! Its still going.My L trime needs work,So Id figured id throw my 2 cents in.
I noticed there are 3 cuculare casting marks on the inner plastic trim.Behind that are the mounting screws for the L trim.Im gona try a 1/2 inch drill and drill the plastic out on 1 to see if I can get in there with a 1/4 drive socket.I will let you know what end results are.
Thank you all
I noticed there are 3 cuculare casting marks on the inner plastic trim.Behind that are the mounting screws for the L trim.Im gona try a 1/2 inch drill and drill the plastic out on 1 to see if I can get in there with a 1/4 drive socket.I will let you know what end results are.
Thank you all
10-27-2015, 03:33 PM
#18
Registered User
My 87 4runner has made 26 trips from East Coast to the Rockies! Its still going.My L trime needs work,So Id figured id throw my 2 cents in.
I noticed there are 3 cuculare casting marks on the inner plastic trim.Behind that are the mounting screws for the L trim.Im gona try a 1/2 inch drill and drill the plastic out on 1 to see if I can get in there with a 1/4 drive socket.I will let you know what end results are.
Thank you all
I noticed there are 3 cuculare casting marks on the inner plastic trim.Behind that are the mounting screws for the L trim.Im gona try a 1/2 inch drill and drill the plastic out on 1 to see if I can get in there with a 1/4 drive socket.I will let you know what end results are.
Thank you all
Really? You're going to drill out the trim? The directions on how to remove it are on this forum if you do a search. The diagram above is a good place to start.

Thread
Thread Starter
Forum
Replies
Last Post


