
2nd Gen 3VZE engine: R U thinking of doing timing belt/water pump? My observations
 May 16, 2004 | 08:21 PM
#1
Thread Starter
Registered User
Joined: Aug 2003
Posts: 122
Likes: 0
From: Taxachusetts
2nd Gen 3VZE engine: R U thinking of doing timing belt/water pump? My observations
For those of you Toyota owners with 3 VZE engine, who either have to or want to change their timing belt/water pump... Here are some tips and observations. FYI, if it has been more than 70K since your last timing belt, it is due. If it has been over 100k, it is overdue and asking to be broken.
First, the water pump is timing belt driven. Don't even ask, that is a terrible design.. That means, you have to remove the timing belt to do the water pump. That also means you would be crazy not to do the water pump if you do the timing belt, and vice versa. Toyota recommends timing belt change at 60,000 miles.. it can probably go a little longer, 75k or so. But after that, you are asking for it to break. Since you need to pull the entire engine front apart to do this job, this is also a good time to replace your drivebelts, thermostat, etc. The thermostat is on the waterpump and is relatively a pain to get to normally, so might as well replace it with a new one now.
The basic sequence is this :
1)Remove radiator
2) Remove fan clutch,fan.. etc
3) Remove all drivebelts and most pulleys
4) Remove sparkplugs
4) Remove crankshaft pulley
5) Remove all timing belt cover
6) Remove timing belt
7) Remove waterpump
Guaranteed many hours of fun, fun, fun....
Regardless, I had no choice as my water pump gasket was leaking. I had to do it or pay someone else to do it. After getting quotes of $700-800 from dealer and $600 from non-dealer, I decided to do it myself. So here is the list of things you need to know
1) You will need good instructions.. preferably original Toyota service manuals. However, Autozone.com provides fairly good instructions as well, and they are free. Just look under repair guides. It will not, however, tell you about the potential pitfalls, like the fact that you need special tools to remove certain components or you are stuck.
2) You WILL need good tools and TORQUE wrenches. Due to wide range of torques involved, probably two different size wrenches are required. Rent them or buy them, you don't want to screw it up.
3) You will need special tools, some of which you can get lended from Autozone - pulley pullers and probably a torque wrench
4) You will need ONE special tool which you cannot get from Autozone - Crankshaft pulley holder- it holds the pulley while you unscrew the bolt that holds it - I assume you can get it from a Toyota dealer - I did not have one, and that nearly ruined my day. I was able to get around it with some luck by using other less than perfect technics to hold the pulley and breaking some tools in the process during several hours. I would not attempt this job again without one. Considering that you need to tighten the pulley to 181 FT LBS (245 NM) of force (or overcome that amount of force to losen it in the first place), there is little alternative to the special tool. If you decided to do it, Toyota dealer should be able to provide you with the SST number for the tool..
5) Clean off engine block where the water pump mounts to perfection - you will not have a chance to find out that there is a leak until you put the whole thing back together - and that will surely ruin your afternoon after you just spent several hours reassembling your car. A half assed job at this point is not an option. On many normal engines where the waterpump is fanbelt or some other accessory belt driven, a leak after reassembly would be annoying, but on this engine, a leak at that point will make you wanna go jump in some deep lake.
5) Use seal packing and gasket on the waterpump - not one or the other alone, or else it will probably leak soon. Incidentally, my waterpump was done under previous owner, by a dealer, about 65k miles ago. The fact that the gasket failed could be attributed to several factors.. but one of them, after I took off my waterpump, they used silicon seal packing only, and looked like not enough in some places. So many hours of work, only to get to that leak.. you get the idea.
6) You can spend x amount on parts from a parts store, or double that from Toyota dealer, your choice. Personally, as far as belts go, Toyota timing belt does not appear to me to be of higher quality than aftermarket. The belt I pulled out of the car had 65k miles on it. It was a Toyota belt put it by a dealer when the water pump was done, as mentioned earlier. It had cracks all over the top and was in poor shape. I have seen aftermarket timing belts with more miles that looked significantly better. I put in Gatorback aftermaket belt.
7) Well, if you do it, when you are done, at least you know it was done right. Not to mention the tremendous satisfaction of accomplishing a major repair. I know what everything was torqued to proper specs, for example. I have seen even dealers screw up so many times.... There is no way to know what goofball was working on your car and if he took the time to torque 2 of the waterpump bolts to one spec, and the other 5 to another, lower spec, as the factory service manual calls for. Something like that you cannot check, and if 30k down the road the pump leaks, you wont be able to know if that's because they did a poor job.
It is nice to do it in a garage, if you have one. I did mine outside, and it rained all day as I was doing it. I was wet and cursing when I was done, but it was worth it.
Good luck, and feel free to post questions, comments, etc!
May 17, 2004 | 05:10 AM
#2
Registered User
Joined: Oct 2003
Posts: 1,264
Likes: 1
From: mayport FL
4) You will need ONE special tool which you cannot get from Autozone - Crankshaft pulley holder- it holds the pulley while you unscrew the bolt that holds it - I assume you can get it from a Toyota dealer - I did not have one, and that nearly ruined my day. I was able to get around it with some luck by using other less than perfect technics to hold the pulley and breaking some tools in the process during several hours. I would not attempt this job again without one. Considering that you need to tighten the pulley to 181 FT LBS (245 NM) of force (or overcome that amount of force to losen it in the first place), there is little alternative to the special tool. If you decided to do it, Toyota dealer should be able to provide you with the SST number for the tool..
Also torquing the harmonic balencer bolt if you throw the engine in 3rd gear if you have a standard transmission on a incline you can easily torque that bolt to max torque of 181ft lbs.
Last edited by 934rnr; May 17, 2004 at 06:33 AM.
May 17, 2004 | 07:50 AM
#4
Thread Starter
Registered User
Joined: Aug 2003
Posts: 122
Likes: 0
From: Taxachusetts
Originally Posted by 934rnr
You don't have to have the tool as you mentioned I used the flat end handle of a craftsman 1/2 ratchet or a large flat tip screwdriver perched on the the end of one of the back cover bolt between the cam gear wheel to untorque and retorque the cam gear bolts. This is with everything assembled and the tensioner on. The cam gear bolts are at 80ft lbs I believe.
Also torquing the harmonic balencer bolt if you throw the engine in 3rd gear if you have a standard transmission on a incline you can easily torque that bolt to max torque of 181ft lbs.
Also torquing the harmonic balencer bolt if you throw the engine in 3rd gear if you have a standard transmission on a incline you can easily torque that bolt to max torque of 181ft lbs.
May 17, 2004 | 07:54 AM
#5
Thread Starter
Registered User
Joined: Aug 2003
Posts: 122
Likes: 0
From: Taxachusetts
Originally Posted by williemon
Do you need a special tool to hold the cam gears?
May 17, 2004 | 08:23 AM
#6
Registered User
Joined: Oct 2003
Posts: 163
Likes: 0
From: Portland Oregon
its been awhile since I've done this, but as far as the crankshaft pulley, I made my own out of piping I bought at Homebase....It cost like $5 and worked perfectly. basically all I did was buy a 2ft pipe and made two forks about 3" long and about 3" apart from eachother
looked like this F
stick the two forks in the center of the pulley between the gaps to hold the pulley in place.
Its hard to explain but once you see the real tool and the cranckshaft pulley it makes sence.
looked like this F
stick the two forks in the center of the pulley between the gaps to hold the pulley in place.
Its hard to explain but once you see the real tool and the cranckshaft pulley it makes sence.
May 17, 2004 | 09:16 AM
#7
Registered User
Joined: Jul 2002
Posts: 682
Likes: 0
From: Highlands, NC
http://www.off-road.com/toyota/tech/v6tbelt/index.html
This shows a visual of the job. A lot of steps are not covered.
I already had a pulley puller and a torque wrench. I made something to hold the pulley from turning likemrmojorisinphan. Make sure to replace the bearings in the idler pulleys. I didn't, and the upper one took a crap not more than 2000 miles after I did the job. I used an after market belt which now has almost 90k miles. Guess its time to do it again.
Trending Topics
Aug 16, 2007 | 10:22 PM
#9
Registered User
Joined: Apr 2007
Posts: 1,301
Likes: 3
From: Valencia, California
sounds like a job. i dont know if mine was EVER changed. i have to ask, if not, it would have almost 190k on it! holy crap, i hope it im okay...
damn 600 bucks for that!!! i dont have that kind of money either... but if it needs it. you can buy a cheapo 4runner for 600 bucks damn!....
im bummed out...
how much is it if you do it?
anyone wanna do it for me? ill pay u! (idk how much hahah)
southern californa 3 miles from magic mountain!!!! ill get you in! hahahh
Aug 16, 2007 | 11:26 PM
#10
Contributing Member
Joined: Dec 2006
Posts: 3,607
Likes: 2
From: maryland
For those of you Toyota owners with 3 VZE engine, who either have to or want to change their timing belt/water pump... Here are some tips and observations. FYI, if it has been more than 70K since your last timing belt, it is due. If it has been over 100k, it is overdue and asking to be broken.
First, the water pump is timing belt driven. Don't even ask, that is a terrible design.. That means, you have to remove the timing belt to do the water pump. That also means you would be crazy not to do the water pump if you do the timing belt, and vice versa. Toyota recommends timing belt change at 60,000 miles.. it can probably go a little longer, 75k or so. But after that, you are asking for it to break. Since you need to pull the entire engine front apart to do this job, this is also a good time to replace your drivebelts, thermostat, etc. The thermostat is on the waterpump and is relatively a pain to get to normally, so might as well replace it with a new one now.
The basic sequence is this :
1)Remove radiator
2) Remove fan clutch,fan.. etc
3) Remove all drivebelts and most pulleys
4) Remove sparkplugs
4) Remove crankshaft pulley
5) Remove all timing belt cover
6) Remove timing belt
7) Remove waterpump
Guaranteed many hours of fun, fun, fun....
Regardless, I had no choice as my water pump gasket was leaking. I had to do it or pay someone else to do it. After getting quotes of $700-800 from dealer and $600 from non-dealer, I decided to do it myself. So here is the list of things you need to know
1) You will need good instructions.. preferably original Toyota service manuals. However, Autozone.com provides fairly good instructions as well, and they are free. Just look under repair guides. It will not, however, tell you about the potential pitfalls, like the fact that you need special tools to remove certain components or you are stuck.
2) You WILL need good tools and TORQUE wrenches. Due to wide range of torques involved, probably two different size wrenches are required. Rent them or buy them, you don't want to screw it up.
3) You will need special tools, some of which you can get lended from Autozone - pulley pullers and probably a torque wrench
4) You will need ONE special tool which you cannot get from Autozone - Crankshaft pulley holder- it holds the pulley while you unscrew the bolt that holds it - I assume you can get it from a Toyota dealer - I did not have one, and that nearly ruined my day. I was able to get around it with some luck by using other less than perfect technics to hold the pulley and breaking some tools in the process during several hours. I would not attempt this job again without one. Considering that you need to tighten the pulley to 181 FT LBS (245 NM) of force (or overcome that amount of force to losen it in the first place), there is little alternative to the special tool. If you decided to do it, Toyota dealer should be able to provide you with the SST number for the tool..
5) Clean off engine block where the water pump mounts to perfection - you will not have a chance to find out that there is a leak until you put the whole thing back together - and that will surely ruin your afternoon after you just spent several hours reassembling your car. A half assed job at this point is not an option. On many normal engines where the waterpump is fanbelt or some other accessory belt driven, a leak after reassembly would be annoying, but on this engine, a leak at that point will make you wanna go jump in some deep lake.
5) Use seal packing and gasket on the waterpump - not one or the other alone, or else it will probably leak soon. Incidentally, my waterpump was done under previous owner, by a dealer, about 65k miles ago. The fact that the gasket failed could be attributed to several factors.. but one of them, after I took off my waterpump, they used silicon seal packing only, and looked like not enough in some places. So many hours of work, only to get to that leak.. you get the idea.
6) You can spend x amount on parts from a parts store, or double that from Toyota dealer, your choice. Personally, as far as belts go, Toyota timing belt does not appear to me to be of higher quality than aftermarket. The belt I pulled out of the car had 65k miles on it. It was a Toyota belt put it by a dealer when the water pump was done, as mentioned earlier. It had cracks all over the top and was in poor shape. I have seen aftermarket timing belts with more miles that looked significantly better. I put in Gatorback aftermaket belt.
7) Well, if you do it, when you are done, at least you know it was done right. Not to mention the tremendous satisfaction of accomplishing a major repair. I know what everything was torqued to proper specs, for example. I have seen even dealers screw up so many times.... There is no way to know what goofball was working on your car and if he took the time to torque 2 of the waterpump bolts to one spec, and the other 5 to another, lower spec, as the factory service manual calls for. Something like that you cannot check, and if 30k down the road the pump leaks, you wont be able to know if that's because they did a poor job.
It is nice to do it in a garage, if you have one. I did mine outside, and it rained all day as I was doing it. I was wet and cursing when I was done, but it was worth it.
Good luck, and feel free to post questions, comments, etc!
First, the water pump is timing belt driven. Don't even ask, that is a terrible design.. That means, you have to remove the timing belt to do the water pump. That also means you would be crazy not to do the water pump if you do the timing belt, and vice versa. Toyota recommends timing belt change at 60,000 miles.. it can probably go a little longer, 75k or so. But after that, you are asking for it to break. Since you need to pull the entire engine front apart to do this job, this is also a good time to replace your drivebelts, thermostat, etc. The thermostat is on the waterpump and is relatively a pain to get to normally, so might as well replace it with a new one now.
The basic sequence is this :
1)Remove radiator
2) Remove fan clutch,fan.. etc
3) Remove all drivebelts and most pulleys
4) Remove sparkplugs
4) Remove crankshaft pulley
5) Remove all timing belt cover
6) Remove timing belt
7) Remove waterpump
Guaranteed many hours of fun, fun, fun....
Regardless, I had no choice as my water pump gasket was leaking. I had to do it or pay someone else to do it. After getting quotes of $700-800 from dealer and $600 from non-dealer, I decided to do it myself. So here is the list of things you need to know
1) You will need good instructions.. preferably original Toyota service manuals. However, Autozone.com provides fairly good instructions as well, and they are free. Just look under repair guides. It will not, however, tell you about the potential pitfalls, like the fact that you need special tools to remove certain components or you are stuck.
2) You WILL need good tools and TORQUE wrenches. Due to wide range of torques involved, probably two different size wrenches are required. Rent them or buy them, you don't want to screw it up.
3) You will need special tools, some of which you can get lended from Autozone - pulley pullers and probably a torque wrench
4) You will need ONE special tool which you cannot get from Autozone - Crankshaft pulley holder- it holds the pulley while you unscrew the bolt that holds it - I assume you can get it from a Toyota dealer - I did not have one, and that nearly ruined my day. I was able to get around it with some luck by using other less than perfect technics to hold the pulley and breaking some tools in the process during several hours. I would not attempt this job again without one. Considering that you need to tighten the pulley to 181 FT LBS (245 NM) of force (or overcome that amount of force to losen it in the first place), there is little alternative to the special tool. If you decided to do it, Toyota dealer should be able to provide you with the SST number for the tool..
5) Clean off engine block where the water pump mounts to perfection - you will not have a chance to find out that there is a leak until you put the whole thing back together - and that will surely ruin your afternoon after you just spent several hours reassembling your car. A half assed job at this point is not an option. On many normal engines where the waterpump is fanbelt or some other accessory belt driven, a leak after reassembly would be annoying, but on this engine, a leak at that point will make you wanna go jump in some deep lake.
5) Use seal packing and gasket on the waterpump - not one or the other alone, or else it will probably leak soon. Incidentally, my waterpump was done under previous owner, by a dealer, about 65k miles ago. The fact that the gasket failed could be attributed to several factors.. but one of them, after I took off my waterpump, they used silicon seal packing only, and looked like not enough in some places. So many hours of work, only to get to that leak.. you get the idea.
6) You can spend x amount on parts from a parts store, or double that from Toyota dealer, your choice. Personally, as far as belts go, Toyota timing belt does not appear to me to be of higher quality than aftermarket. The belt I pulled out of the car had 65k miles on it. It was a Toyota belt put it by a dealer when the water pump was done, as mentioned earlier. It had cracks all over the top and was in poor shape. I have seen aftermarket timing belts with more miles that looked significantly better. I put in Gatorback aftermaket belt.
7) Well, if you do it, when you are done, at least you know it was done right. Not to mention the tremendous satisfaction of accomplishing a major repair. I know what everything was torqued to proper specs, for example. I have seen even dealers screw up so many times.... There is no way to know what goofball was working on your car and if he took the time to torque 2 of the waterpump bolts to one spec, and the other 5 to another, lower spec, as the factory service manual calls for. Something like that you cannot check, and if 30k down the road the pump leaks, you wont be able to know if that's because they did a poor job.
It is nice to do it in a garage, if you have one. I did mine outside, and it rained all day as I was doing it. I was wet and cursing when I was done, but it was worth it.
Good luck, and feel free to post questions, comments, etc!
I never even considered pulling the spark plugs still can't see what benifit you would have gained.
As for the Special crankshaft pulley holder any MAC , SNAP ON , EVEN CRAFTSMAN sell a chain wrench that works perfect for the job.
Lining up the timing marks I belive to be the most important part of the whole job. Also getting the belt backlash just right is also very impotant and this may suck but around 30k miles retighten the belt to make it last longer.
All in all it took me around 2-2 1/2 hrs to complete the job and what a differance it made in my piece of mind I did mine at 214,565 miles just a few things I thought of after reading this post.
Last edited by olharleyman; Aug 16, 2007 at 11:29 PM.
Aug 17, 2007 | 05:20 AM
#11
Registered User
Joined: May 2002
Posts: 2,479
Likes: 2
From: Cincinnati Ohio
Makes turning over the engine to get it at TDC easier. I wouldn't recommend it though, as the spark plugs are a pita to remove. I had to use 2 helicoils after I changed mine last time.
Dec 10, 2007 | 02:16 AM
#12

Registered User
Joined: Dec 2007
Posts: 2
Likes: 0
First post, y'all!
I just did the timing belt on my 1990 4Runner 3VZE for the third time. First time was a scheduled belt change, second time was when I was changing the water pump (and just changed the belt while I had the whole thing apart) and this time, the top idler pulley let go at 65. What a mess. Bearings and shrapnel every where. Word to the wise...when you hear a howling coming from the timing belt cover, it is probably the idler.
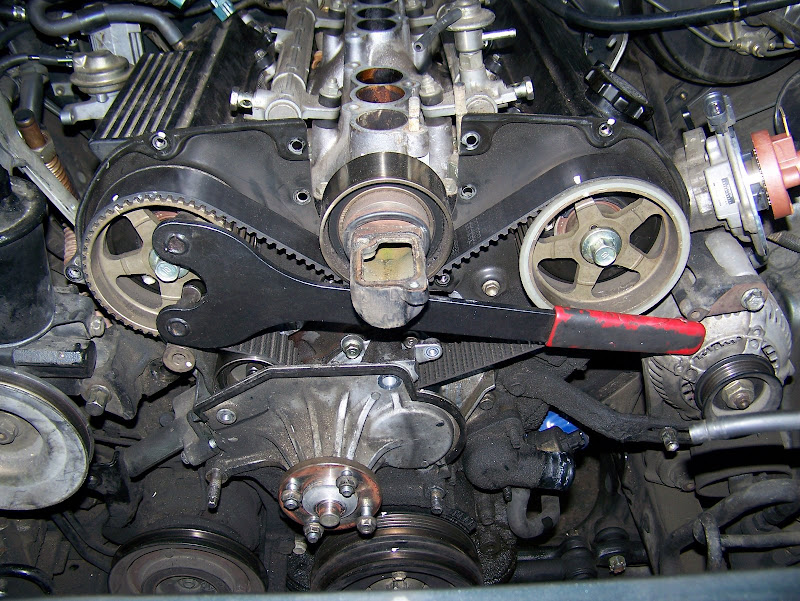
Here is a pic that someone posted showing the whole front right after a timing belt/idler/tensioner/water pump change. These parts will cost you about $270 at Napa. The idler, by the way, is at the top of the picture between the cam sprockets. The timing belt runs under it.

The guy at Napa said he has sold many of those idlers over the years and says they are prone to failure on that engine. After seeing mine go ballistic, I'm not surprised.
The good news was that there was no damage to the engine or other parts. The water pump and thermostat were just changed in September so I left them alone but typically, I suggest (like others here have mentioned) that they be changed with the timing belt.
There were a few things I ran into on this job that I thought I'd pass along that may help someone else down the road.
I had a helluva time removing the camshaft sprockets. Your best option...use an air-impact wrench. I don't have one so I had to find other means. The sprockets have never been off this rig and I was working in 29 degree weather and the bolts were stuck hard. I thought about the socket-on-the-bolt trick utilizing the dust shield mounting bolts similar to how 934rnr suggested but in retrospect, I am glad I did not. In the end, I used a cheap version of a balancer puller like this one:

I put a bolt in one of the slots and tightened it in the right position with a nut so that it and the center screw were up against two of the "spokes" of the sprocket. I then used a large pipe wrench to hold the balancer puller (and thus the sprocket) while I turned the bolt that secures the sprocket.
I got lots of power this way because I was using a long breaker bar and a big pipe wrench but I still couldn't get it to budge. I tried heat and penetrating fluid too. No dice. That's when I did a search and ended up here thinking maybe they were left hand threads.
Ultimately, I forced it. I had a buddy come over and he got on one side of the truck and held the pipe wrench with both hands and I pulled for all I was worth on the breaker bar from the other side of the rig. We had tons of leverage and good grip and were applying easily over 200-250 ft-lbs before that beotch finally broke free at which point both of us smashed our elbows. Thank God for strong sockets.
I can only attribute this difficulty to the fact that the flange on the bolts is much wider than the bolt head itself. The increased surface area and the fact that the bolts had been there for 200k miles all contributed to the torque required to remove being much higher than the spec'd 80 ft-lb required to install. I'm just glad I didn't round either of them off.
For installation, I put a 10mm 3/8 inch deep socket over the dust cover bolt head that is behind the sprocket and held it while my buddy clicked the sprocket bolt to 80 ft-lbs. I am absolutely certain that method would not have worked for removal in my case. As always, YMMV.
Anyway...if you are doing the timing belt or water pump and the idler has never been replaced, I'd suggest doing it. The 3VZE is not an interference engine so you don't have to worry about bending valves when the bearing fails but it is a lot more convenient to do the job when you are planning on it.
A timing belt kit that I bought at Napa included the belt, a new idler and a new tensioner for a little over $200. This sounds like a lot but the idler is fairly fancy so I don't think it's too far out of line.
Hopefully, my experience will help someone else out there.
Peace.
Keith
I just did the timing belt on my 1990 4Runner 3VZE for the third time. First time was a scheduled belt change, second time was when I was changing the water pump (and just changed the belt while I had the whole thing apart) and this time, the top idler pulley let go at 65. What a mess. Bearings and shrapnel every where. Word to the wise...when you hear a howling coming from the timing belt cover, it is probably the idler.
Here is a pic that someone posted showing the whole front right after a timing belt/idler/tensioner/water pump change. These parts will cost you about $270 at Napa. The idler, by the way, is at the top of the picture between the cam sprockets. The timing belt runs under it.
The guy at Napa said he has sold many of those idlers over the years and says they are prone to failure on that engine. After seeing mine go ballistic, I'm not surprised.
The good news was that there was no damage to the engine or other parts. The water pump and thermostat were just changed in September so I left them alone but typically, I suggest (like others here have mentioned) that they be changed with the timing belt.
There were a few things I ran into on this job that I thought I'd pass along that may help someone else down the road.
I had a helluva time removing the camshaft sprockets. Your best option...use an air-impact wrench. I don't have one so I had to find other means. The sprockets have never been off this rig and I was working in 29 degree weather and the bolts were stuck hard. I thought about the socket-on-the-bolt trick utilizing the dust shield mounting bolts similar to how 934rnr suggested but in retrospect, I am glad I did not. In the end, I used a cheap version of a balancer puller like this one:
I put a bolt in one of the slots and tightened it in the right position with a nut so that it and the center screw were up against two of the "spokes" of the sprocket. I then used a large pipe wrench to hold the balancer puller (and thus the sprocket) while I turned the bolt that secures the sprocket.
I got lots of power this way because I was using a long breaker bar and a big pipe wrench but I still couldn't get it to budge. I tried heat and penetrating fluid too. No dice. That's when I did a search and ended up here thinking maybe they were left hand threads.
Ultimately, I forced it. I had a buddy come over and he got on one side of the truck and held the pipe wrench with both hands and I pulled for all I was worth on the breaker bar from the other side of the rig. We had tons of leverage and good grip and were applying easily over 200-250 ft-lbs before that beotch finally broke free at which point both of us smashed our elbows. Thank God for strong sockets.
I can only attribute this difficulty to the fact that the flange on the bolts is much wider than the bolt head itself. The increased surface area and the fact that the bolts had been there for 200k miles all contributed to the torque required to remove being much higher than the spec'd 80 ft-lb required to install. I'm just glad I didn't round either of them off.
For installation, I put a 10mm 3/8 inch deep socket over the dust cover bolt head that is behind the sprocket and held it while my buddy clicked the sprocket bolt to 80 ft-lbs. I am absolutely certain that method would not have worked for removal in my case. As always, YMMV.
Anyway...if you are doing the timing belt or water pump and the idler has never been replaced, I'd suggest doing it. The 3VZE is not an interference engine so you don't have to worry about bending valves when the bearing fails but it is a lot more convenient to do the job when you are planning on it.
A timing belt kit that I bought at Napa included the belt, a new idler and a new tensioner for a little over $200. This sounds like a lot but the idler is fairly fancy so I don't think it's too far out of line.
Hopefully, my experience will help someone else out there.
Peace.
Keith
Dec 10, 2007 | 02:25 AM
#13
Registered User
Joined: Dec 2007
Posts: 2
Likes: 0
Someone please correct me if I'm wrong here.
Dec 10, 2007 | 03:47 AM
#14
Registered User
Joined: Mar 2005
Posts: 1,756
Likes: 7
From: New Brunswick, Canada
As an aside, it isn't necessary to pull the plugs to find TDC while doing a belt change. The mark on the crankshaft only lines up at TDC. The thing to worry about is whether the rotor (driven by the driver-side camshaft) is pointing to the number 1 plug wire when the camshaft alignment mark is vertical. I don't know for sure but I suspect the rotation of the rotor to camshaft is a 2-1 ratio (fires on compression and not exhaust stroke).
Someone please correct me if I'm wrong here.
Someone please correct me if I'm wrong here.
Feb 7, 2008 | 08:03 AM
#15

Registered User
Joined: Feb 2008
Posts: 54
Likes: 0
i have that same 3VZ-E 3.0 dual over head cam motor in my 92 pickup and i have it apart right now and i am having a hard time finding a water pump for it. the water pump that i took off it was not pumping water. i replaced the thermostat and i took the top radiator hose off and let the truck run nothing but steam came out so i turne the truck off and water started coming out so i shot water through the top radiator hose with it off and it went back through to the radiator so i know its not stopped up. did u have a hard time finding a water pump? everywhere i go tries to give me one for a single cam. and the impellers on the water pump are slapping the water instead of pushing it. can you help me out????
Last edited by wcc_71; Feb 7, 2008 at 08:27 AM.
Feb 7, 2008 | 08:15 AM
#16
Registered User
Joined: Mar 2007
Posts: 318
Likes: 0
From: Orange, CA
for holding the cam sprockets in place for loosening/tightening the bolt, this is the type of tool you need. I'd stay away from chain wrenches:
http://www.shoptoolsshoptools.com/shopexd.asp?id=1956

I have seen similar ones on ebay for about $20. Here's a pic of a MAC version of this tool that a local shop let me borrow:
http://www.shoptoolsshoptools.com/shopexd.asp?id=1956
I have seen similar ones on ebay for about $20. Here's a pic of a MAC version of this tool that a local shop let me borrow:
Feb 8, 2008 | 03:55 PM
#17
Thread Starter
Registered User
Joined: Aug 2003
Posts: 122
Likes: 0
From: Taxachusetts
i have that same 3VZ-E 3.0 dual over head cam motor in my 92 pickup and i have it apart right now and i am having a hard time finding a water pump for it. the water pump that i took off it was not pumping water. i replaced the thermostat and i took the top radiator hose off and let the truck run nothing but steam came out so i turne the truck off and water started coming out so i shot water through the top radiator hose with it off and it went back through to the radiator so i know its not stopped up. did u have a hard time finding a water pump? everywhere i go tries to give me one for a single cam. and the impellers on the water pump are slapping the water instead of pushing it. can you help me out????
 I attribute it to the fact that the dealer will take your arm, leg and firstborn to do the timing belt, so as long as these motors are around, there will be no lack of DIY interest i this particular repair. I do not even have the truck anymore, but doing this belt was a memorable experience.
I had no issues locating the waterpump. In fact, every major automotive chain carried it. You may also want to check rockauto.com.. they sometimes have better quality parts than chain stores at lower prices, even with shipping.
I am not sure from your description what the problem is. Just take the old pump to the store and see if it looks the same. If it is the same, but it is not "pumping" but slapping it, whatever that means, you have a blockage somewhere. As I recall it was the impeller type.. the newer impellers may look a little different, but that is supposed to be improved design that pumps better than the original. As long as the pump is what is called for the motor, regardless of the impeller design, it should be the right one.
Cheers

 Feb 13, 2008 | 01:28 PM
#20

Registered User

Joined: Sep 2007
Posts: 8,381
Likes: 873
From: San Francisco East Bay
To remove the bolt holding the cam pulley on the 3VZE, you can hold the camshaft using the wrench flats in the MIDDLE of the camshafts. You'll need a 27mm (or a 1 1/16") wrench (doesn't everyone have those?). And (of course) you remove the camshaft cover. Since there is no place to "rest" the wrench (the head is aluminum, and you don't want to dent the camshaft cover sealing surface!) you'll need to cut a notch in a 2x4 to hold the end of the wrench against the side of the truck.
When you get the pulleys off, look closely at the 5mm "knock pins" that hold the pulleys to the cams. Mine were bent about 1mm. They are cheap to replace, but the keyway in the pulley was dented too. The two pulleys (left and right) are actually identical, just reversed. By swapping them, the new knock pins no longer touched the dented part.
When you get the pulleys off, look closely at the 5mm "knock pins" that hold the pulleys to the cams. Mine were bent about 1mm. They are cheap to replace, but the keyway in the pulley was dented too. The two pulleys (left and right) are actually identical, just reversed. By swapping them, the new knock pins no longer touched the dented part.


