82 hilux build...slow
 04-01-2012, 06:35 PM
#21
Registered User
Thread Starter
Join Date: Mar 2011
Location: Sacramento, CA
Posts: 69
Likes: 0
Received 0 Likes
on
0 Posts
Went ahead and ordered the body lift today. Went with the 1" and grade 8 hardware, and new poly bushings, as mine are pretty shot, and I want to eliminate as much cab noise as possible.
Thanks 4crawler
Got lots done, since my last visit. Bot axles are cleaned up and ready for paint and welding on the shock mounts. Also the front spring hanger is mocked up and ready for welding as well. I even went as far as mounting the front axle to make sure the steering box is mounted correctly. I'll have to wait for marlin to finish fixing my drag link, but it looks pretty darn good to me.
 04-07-2012, 04:11 PM
#22
Registered User
Thread Starter
Join Date: Mar 2011
Location: Sacramento, CA
Posts: 69
Likes: 0
Received 0 Likes
on
0 Posts
So I got my body lift in the mail, everything looks just like I wanted it to. There is a little issue though with what I ordered. The body lift that was on the truck has bolts that have a 19mm head while the lift I have has 14mm head; the 19mm bolt its self is wider than the 14mm. So the hole in the body mount is bigger, Anyone have any issue with me using the thinner 14mm bolts even though the hole they slide through is larger. The old bolts are grade 5's and the new ones are grade 8's
I don't think the bolts should move while everything is torqued down. And of course there are large washers so the bolts won't slide down the hole. I don't really want to have to send everything back and get the oversize hardware.
I don't think the bolts should move while everything is torqued down. And of course there are large washers so the bolts won't slide down the hole. I don't really want to have to send everything back and get the oversize hardware.
Last edited by TheChewMaster; 04-07-2012 at 04:13 PM.
04-09-2012, 06:10 AM
#23
I had a similar issue when I took the body lift off of my truck. The new bushing kit came with smaller bolts so I just went down to Home Depot and got the proper diameter bolts. My worry was that since there are only 6 cab bolt that the thinner bolts stood more of a chance to break and I was also concerned that the cab could shift a little due to the difference in bolt vs hole size.
I spent about $15 in hardware for the nuts, bolts and washers (including the bed). The cost was negate-able and I didn't have to wait or deal with sending the bolts back.
I spent about $15 in hardware for the nuts, bolts and washers (including the bed). The cost was negate-able and I didn't have to wait or deal with sending the bolts back.
04-15-2012, 04:17 PM
#25
Registered User
Thread Starter
Join Date: Mar 2011
Location: Sacramento, CA
Posts: 69
Likes: 0
Received 0 Likes
on
0 Posts
So 4crawler said the bolt size is not really an issue. Here is a direct quote for those with the same question. I didn't want to get new bolts because I would then have to dill out the body lift blocks to a larger diameter, which I am not interested in doing.
"Should be no issue with the stock sized hardware in your kit, once tightened down, things won't move around. The poly bushing kit you have is set up for the supplied size hardware, so that part is fine. As long as the bolts don't pull through the holes in any of the washers, they'll be fine. You could always slip on a 3/8" on top of any of the washers with a larger hole in them to close down the hole" (Roger @ 4crawler)
I did add washers to my install, using a 3/8" grade 8 washer on each end of the bolts. And there are grade 8's all the way around, the old lift had larger diameter bolts but were grade 5's. I mushroomed some of the grade 5's so much when i removed them I had to grind the top to slip through the washers.
04-17-2012, 05:55 PM
#26
Registered User
Thread Starter
Join Date: Mar 2011
Location: Sacramento, CA
Posts: 69
Likes: 0
Received 0 Likes
on
0 Posts
Glad I can help.
Since I've got my front axle mocked up on the springs, I've been looking at my front drive line angle, which is very sharp. I'm very concerned about it. I was not really planning on doing dual cases, but every day I look at my rig it seems like the right way to go. I even have a donor case that came in the back of the truck, but its been outside for a long time. So I tore it apart, check it out:


So I started to clean it up to see how bad the damage is, and if the gears and bearing are even serviceable. Here's the damage:

Do those gears even look serviceable? I don't really think so, I don't want my gears to fail while i'm on a trail, sounds awful.
So I've gone from just a new front drive line, to custom front and read drive line. Will prob get mine from Davez. I've liked what I've seen from them, and they seem like good people. But I've got to fully commit to dual cases. The consensus i've read seems to be, put in dual cases if there are serious front drive line issues, and it will alleviate the super sharp angle
Since I've got my front axle mocked up on the springs, I've been looking at my front drive line angle, which is very sharp. I'm very concerned about it. I was not really planning on doing dual cases, but every day I look at my rig it seems like the right way to go. I even have a donor case that came in the back of the truck, but its been outside for a long time. So I tore it apart, check it out:
So I started to clean it up to see how bad the damage is, and if the gears and bearing are even serviceable. Here's the damage:
Do those gears even look serviceable? I don't really think so, I don't want my gears to fail while i'm on a trail, sounds awful.
So I've gone from just a new front drive line, to custom front and read drive line. Will prob get mine from Davez. I've liked what I've seen from them, and they seem like good people. But I've got to fully commit to dual cases. The consensus i've read seems to be, put in dual cases if there are serious front drive line issues, and it will alleviate the super sharp angle
04-22-2012, 08:55 PM
#27
Registered User
Thread Starter
Join Date: Mar 2011
Location: Sacramento, CA
Posts: 69
Likes: 0
Received 0 Likes
on
0 Posts
In tearing apart my possible donor case I've run into a roadblock. I can't get the shift forks to move. The case is old and rusty obviously. So is it possible the forks are just frozen in place, or am I doing something wrong? Has anyone else removed these shift forks before, and encountered these problems? Should the forks move quite easily with just your hands?
I followed what Marlin said in their donor case write up, and I have the original Toyota repair manual, not that Haynes garbage. In both write ups it makes moving the 2wd/4wd shift fork sounds really simple. I've used pry bars to pull the fork towards the rear of the case, and hammered on front side of the fork. I've also used penetrating oil and my map gas torch, and I've maybe moved it two tenths of a millimeter. I've hammered on it so hard and so many times both of the needle roller bearing have fallen out, and the front wheel drive gear sits loosly on the main shaft. (the shaft portion of the fork shows no wear from this)
Any help would be appreciated. I can grab some pics of necessary. And here is the link to Marlin's crawler install page. I'm having issues at the end of page 2 and beginning of page 3. http://www.marlincrawler.com/sites/a...-installer.pdf
Last edited by TheChewMaster; 04-22-2012 at 08:57 PM.
07-15-2012, 08:18 PM
#28
Registered User
Thread Starter
Join Date: Mar 2011
Location: Sacramento, CA
Posts: 69
Likes: 0
Received 0 Likes
on
0 Posts
Well been a while
Junked donor case for spare parts, sits in pieces on my garage floor. Went with dual cases, ordered a crawl box from marlin. And a tripple stick from Davez off road performance. Installed them together, and with a little finagling got the, to work great together. I had ordered heavy duty detent springs for my shift rails, I took them out because they were making it too hard to shift. Maybe I'll put them in when my rails get worn and won't stay in gear.

Should be installing it later tonight with my girlfriends help
Junked donor case for spare parts, sits in pieces on my garage floor. Went with dual cases, ordered a crawl box from marlin. And a tripple stick from Davez off road performance. Installed them together, and with a little finagling got the, to work great together. I had ordered heavy duty detent springs for my shift rails, I took them out because they were making it too hard to shift. Maybe I'll put them in when my rails get worn and won't stay in gear.
Should be installing it later tonight with my girlfriends help
Last edited by TheChewMaster; 07-15-2012 at 08:19 PM.
08-18-2012, 01:16 PM
#29
Registered User
Thread Starter
Join Date: Mar 2011
Location: Sacramento, CA
Posts: 69
Likes: 0
Received 0 Likes
on
0 Posts
Wow it's been a while. Since my last visit I've installed the dual cases. My buddy and I did it with a simple floor jack. Bad idea in my opinion. In the future I'll buy or borrow a small lift to put it in. The tripple stick has also been a little bit of a hassle. I got it all in and adjusted, then I realized I forgot to install the 4wd indicator. So I installed it, but the indicator Lines up right under the shift rail. So I'm going to have move the rail to the outside Of the bracket and see how it works
I've gotten much of the welding done. Rear spring hangers, front spring hanger, and much of the steering box as well. Also put in a rear shock relocation bar from Davez. Welded it in, looks good and should put my shocks in a much better positioning than modifying the orig. one and setting up the /\ that tons of people run. Tied up the lspv, I have not tested it yet, but it works for everyone else why can't it work for me.
I got Paul (my welder buddy) coming tomorrow to finish welding. Hopefully my rig will be sitting on its own wheels soon


 11-28-2012, 03:48 PM
#32
Registered User
Join Date: Jan 2012
Location: Kansas City, Missouri
Posts: 325
Likes: 0
Received 0 Likes
on
0 Posts
11-29-2012, 03:15 AM
#33
Registered User
11-29-2012, 03:47 AM
#34
Registered User
Join Date: Jan 2012
Location: Kansas City, Missouri
Posts: 325
Likes: 0
Received 0 Likes
on
0 Posts
There's some practical limits on how far away from the frame you put the axles starting with the driveshaft angle from front of transfer case to front axle (and from the transmission to the rear axle). The angles do get pretty wild. Maybe you just have to get used to replacing universal joints with higher lifts.
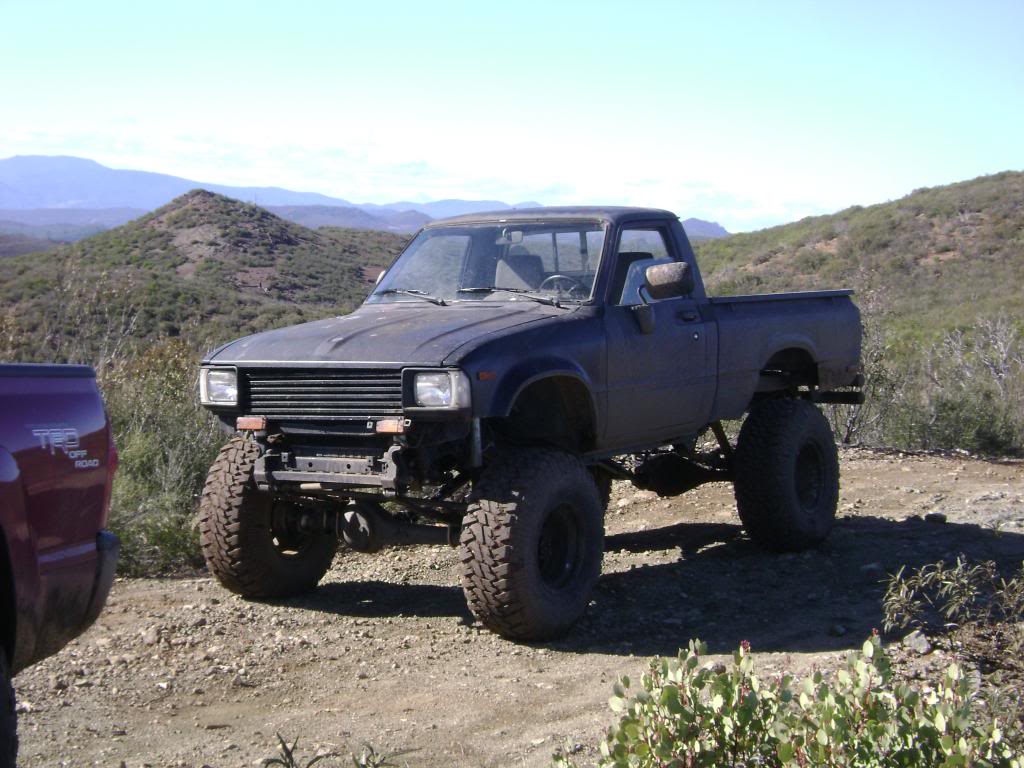
The other main issue is that mounting brackets experience more and much more torque, the farther away from the frame that you pin the axles. All of the brackets have to be disproportionately bigger as you get farther from the frame (not linear). At the same time, it also gets much more expensive. But look at the 4" lift (Marlin kit) done here, and it doesn't seem like there are any weak links! No comprimize work, and ChewM claim NOT to be a fabricator. Damn tough looking build.
I am no expert on how much, but a combination of axle lift and body lift works best. That's what people do. Why the body lift? Maybe someone can clarify.
Oh, one other issue is stability... keeping the frame closer to the ground contributes less to top heaviness... But the 1 inch lift used here is probably for fabrication clearance, maybe the steering box or dual transfer case clearance. The cab is lighter than the frame which is made of thicker metal-and the frame also has engine and transmission/transfer case connected to it! Good idea to keep all of that as low as possible. Nice 1" lift from 4crawler here.
Last edited by 83pingpong; 11-29-2012 at 12:41 PM.
11-29-2012, 04:34 AM
#35
Registered User
From what ive seen, body lifts are just a cheap out. Not that they are bad, just that it ends up causing more noise, less comfortable ride, just a cheap way to get more height. I understand what your saying about driveline angles..but there are some rigs with 8+ inches of suspension lift, and not a single bit of body lift.
11-29-2012, 06:27 AM
#36
Registered User
Join Date: Jan 2012
Location: Kansas City, Missouri
Posts: 325
Likes: 0
Received 0 Likes
on
0 Posts
From what ive seen, body lifts are just a cheap out. Not that they are bad, just that it ends up causing more noise, less comfortable ride, just a cheap way to get more height. I understand what your saying about driveline angles..but there are some rigs with 8+ inches of suspension lift, and not a single bit of body lift.
Last edited by 83pingpong; 11-29-2012 at 12:44 PM.
11-29-2012, 03:11 PM
#37
Registered User
Join Date: Jan 2010
Location: Sonora, CA (Central Sierra)
Posts: 447
Received 0 Likes
on
0 Posts
My 2 cents:
To me, body lifts are just another tool in the toolkit. For some use cases, they work great, for others, they are less desirable. I think they have gotten a bad rap as a result of people adding them to an otherwise stock-height vehicle as a way to cheap out. That should say more about the intelligence of the person who went that way on their rig, and less about the usefulness of the product.
It has been my experience that on some rigs, body lifts work very well in conjunction with suspension lifts. Ultimately, the single biggest reason most off-roaders lift their vehicles is to clear bigger tires, and thus have more ground/axle clearance. As 83pingpong stated, suspension lift can bring its own challenges in terms of an elevated center of gravity, more force (leverage) acting on the brackets and pivots in your suspension system, and more downforce (again, leverage) on your axles and driveline parts. All of these challenges can be overcome very successfully, but at a cost of time, labor, and money.
To put it another way, I don't need to spend $50,000 building a rock-crawler grade suspension and drivetrain on my trail rig. That would be kind of like buying a Lamborghini to drive to the grocery store once a week, great if you can afford it, pointless otherwise.
That being said, on a 1st gen Yota, you can get good performance relatively easily out of a 4 inch spring lift, with a 2 inch body lift. In this configuration, you can clear 33's perfectly with plenty of room for articulation, or 35's with minor cutting on your front fenders. If you get a pro-comp or comparable 4" suspension lift ($650), and a 2 inch body lift ($150), you can run a well balanced, inexpensive trail rig for less than 1000$. With a little welding experience, you can do a RUF mod (approximately 4") instead for about $450, and have a much smoother ride, and only be out 600 bones.
02-05-2013, 03:14 PM
#38
Registered User
Thread Starter
Join Date: Mar 2011
Location: Sacramento, CA
Posts: 69
Likes: 0
Received 0 Likes
on
0 Posts
Here is my take on the body lift.
First; it came with a three inch body lift which in my opinion is large, and not something I would personally install. When three inch BL's are done, the steering shaft and shifter are welded to lengthen. I installed the one inch BL to allow clearance for the tripple sticks and not have to alter either the shifter or the steering shaft. Working in the transmission tunnel was tight in my opinion and I have just the one inch, so customizing the hole for the triple sticks was a little easier.
Second; the lowering of the center of gravity is very true. Read roger's website and he breaks it down from an engineers perspective, when done right body lifts and even axle shims are very useful and safe.
As for my truck. It's pretty much done. I took it out on a successful trial run. However my tranny has been leaking oil, and I'm going to pull it very soon, it's the seal on the input, leaking out the clutch fork arm thingie. Also the tcases are leaking as well as my power steering box. Getting a rebuild kit for the box, and I think I am going to resize my steering shaft because it barley fit. So now some slip shows. Anyone know how much slip is supposed to show? Going to probably put spacers on the wheels all the way around, prob 1.5 inches. we'll see.Ill post some current pics, also got a link to a few gopro/YouTube videos.
Last edited by TheChewMaster; 02-05-2013 at 03:31 PM.